Recording
Recording is an optional Makalu module per playout channel that enables you to record multiple source/input streams simultaneously in different output file formats based on profiles. It can be used, for example, for live or compliance recordings.
Encoder types
Makalu provides the following types of encoders for different recording output file formats:
| Encoder type | Features |
|---|---|
| Standard | Stream recording (in/out) with MP4 file output |
| Broadcast | Stream recording (in/out) with broadcast file format output (for example, XDCAM-HD422, AVC-Intra, or XAVC) and growing file support |
Recording job types
Recordings are internally managed based on recording jobs. For each recording, a corresponding recording job is created. Makalu provides the following types of recording jobs:
| Recording type | Job type | Start | Stop | Description |
|---|---|---|---|---|
| Event-based | Event-based | Automatic | Automatic/Manual | The recording is created based on a secondary event, which contains metadata that defines the properties of the file to be recorded (e.g., format, source, and file name). A recording secondary event is attached to and scheduled for a specific primary (live) event in the rundown. Event-based recording jobs can be created using Makalu Automation and Makalu Traffic. |
| Event-independent | Crash | Manual | Manual | The recording can be started immediately using Makalu Automation. |
| Event-independent | Schedule | Automatic | Automatic/Manual | The recording is scheduled for a fixed time and period. Scheduled recording jobs can be created using Makalu Automation and Makalu Traffic. |
| Event-independent | Recurring | Automatic | Automatic/Manual | The recording is scheduled for a fixed time and period and can be used for recurring recordings according to a defined schedule (for example, from October 1 to October 31, record live source "live1" every Monday and Friday from 10:00 to 11:00 a.m.). Recurring recording jobs can be created using Makalu Automation. |
Depending on the actual workflow, usually either event-based or event-independent recording is enabled. Event-independent recording refers to manually created crash, schedule, and recurring jobs.
Notice
The decision of which app to use for creating a recording job depends on your workflow and how you use Makalu.
Makalu Traffic is designed for creating reusable templates for shows and playlists. It enables you to automatically generate recording jobs whenever a specific show template or playlist is used in the rundown.
Makalu Automation is designed for editing the rundown at short notice. It enables you to manually create recording jobs immediately and independently of the playlists and shows used.
Recording process
The recording process consists of the following steps:
-
A recording job is created to record a selected live source, either based on a live primary event in the rundown (by adding a recording secondary event) or independent of the rundown, based on a defined start and end time (by creating a recording job manually using the Recordings tab).
-
Depending on the selected job type, the recording starts either manually or automatically.
-
While a recording is running, a red recording icon is displayed above the channel preview and in the Recordings tab. The progress is displayed in the job list in the Recordings tab. There, the job can be stopped manually, if necessary. If an operator manually stops a live event, the corresponding recording job also stops at the same time.
-
When the recording job is completed, the recorded file is copied/uploaded from the playout/recording node to the corresponding S3 bucket (ingest storage). It can then be used like a regularly uploaded asset (which was uploaded, for example, using Makalu Asset Uploader), and the file processing starts. This is also confirmed by a notification at the top of the screen and a progress icon in the Transfer tab.
Creating a recording job in Makalu Traffic
Notice
The following steps assume that you have already created a show and want to add a recording job to it. For information about how to create a new show, see the section Schedule (Creating a show).
You can also add recording jobs to playlists or clips in a similar way. For more information about how to edit a playlist, see the section Schedule (Editing a playlist). For more information about how to edit a clip, see the section Schedule (Editing a clip).
To add a recording job to a show:
-
In the sidebar on the left, select Shows.
All available shows of the currently selected channel are listed in the middle.
-
Select the show to be edited and click Open on the right of the corresponding row.
The show details are displayed.
-
On the right in the Library, select the Secondaries tab and below the type Recordings.
All available recording secondary events are displayed below.
-
Depending on the encoder type to be used, add the corresponding recording secondary event to the show by dragging it from the library to the show information area.

Traffic - Add a recording secondary event to a show The recording secondary event is added to the show.
-
Edit the properties of the added recording secondary event as follows:
-
Select the Secondaries tab in the show information area.
All added secondary events are listed below.
-
Hover your mouse over the recording secondary event to be edited and click Open on the right of the corresponding row.
The properties of the selected recording secondary event are displayed on the right.
-
Edit the properties of the added recording secondary event as required.
-
To confirm your changes, click Save.
The properties of the recording secondary event are saved.
-
The show is saved. Whenever you add the show to the rundown, a recording job is automatically created with the properties you selected. You can control it in Makalu Automation in the Recordings area.
Creating a recording job in Makalu Automation
Notice
The areas of the Makalu Automation user interface relevant for recording are the Recordings tab and the corresponding secondary event type listed under Media > Secondary Events > Recordings. Both are only available if the optional Makalu Recording module is enabled for the currently selected playout channel.
Creating an event-based recording job
Notice
Event-based recording jobs are used to record live primary events that are scheduled in the rundown. In this case, only the clean feed of the selected live source is recorded (as fed to Makalu Automation) without any added graphics or other overlays.
To create an event-based recording job:
-
On the right, select the Media tab.
All available media items are listed in the media list at the bottom of the Media tab.
-
In the media list, select Secondary Events > Recordings.
All available recording secondary events are listed to the right.
-
Select a recording secondary event from the media list and drag it onto the live primary event in the rundown to be recorded.
Notice
By default, recording secondary events can only be added to live primary events in the rundown.
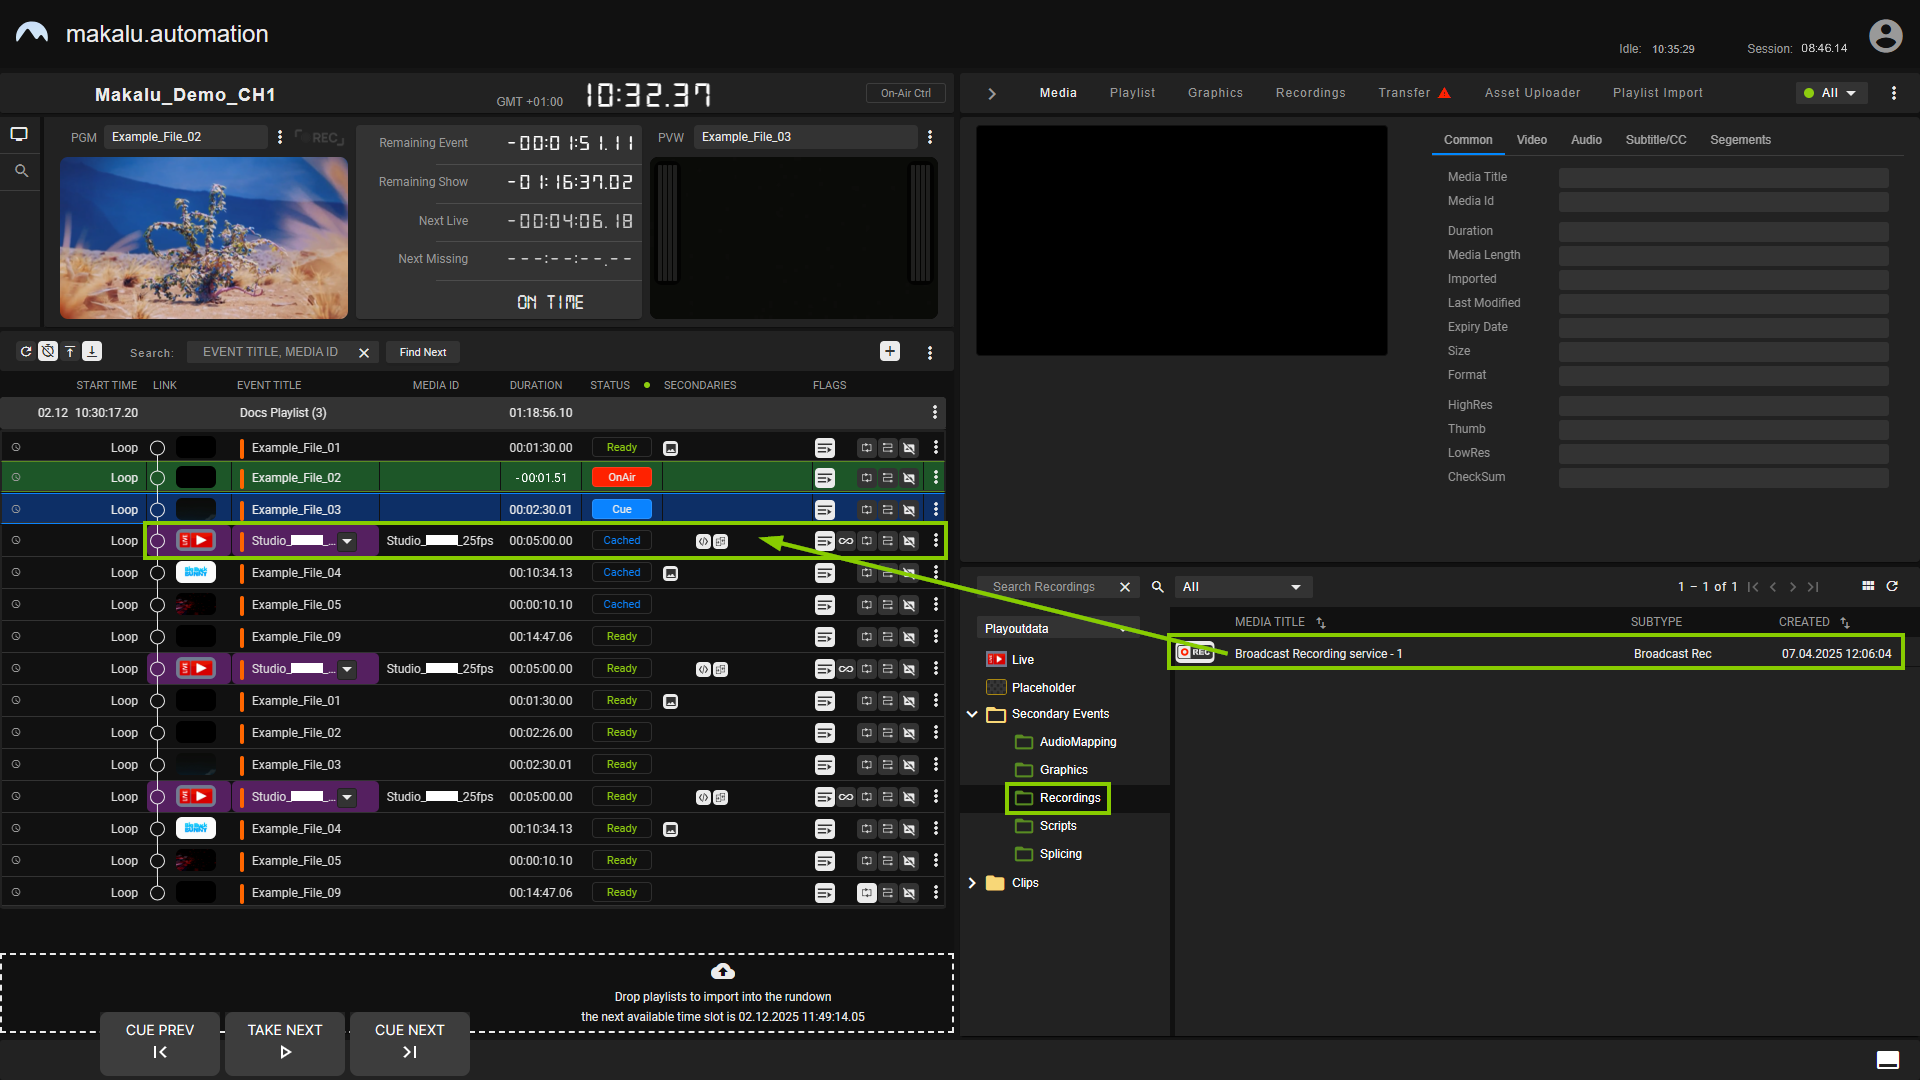
Automation - Add a recording secondary event to the rundown The recording secondary event is added to the live primary event in the rundown. It is recognizable by the Recording secondary event icon
 in the Secondaries column. An additional row for the secondary event and its details expands below. A corresponding recording job is created and added to the job list in the Recordings tab, which is also confirmed by a notification at the top of the screen.
Notice
A job duration is only displayed in the job list if the corresponding live primary event also has a planned duration. If it does not have a planned duration (if the open end flag is enabled), the recording job also does not have a planned duration.
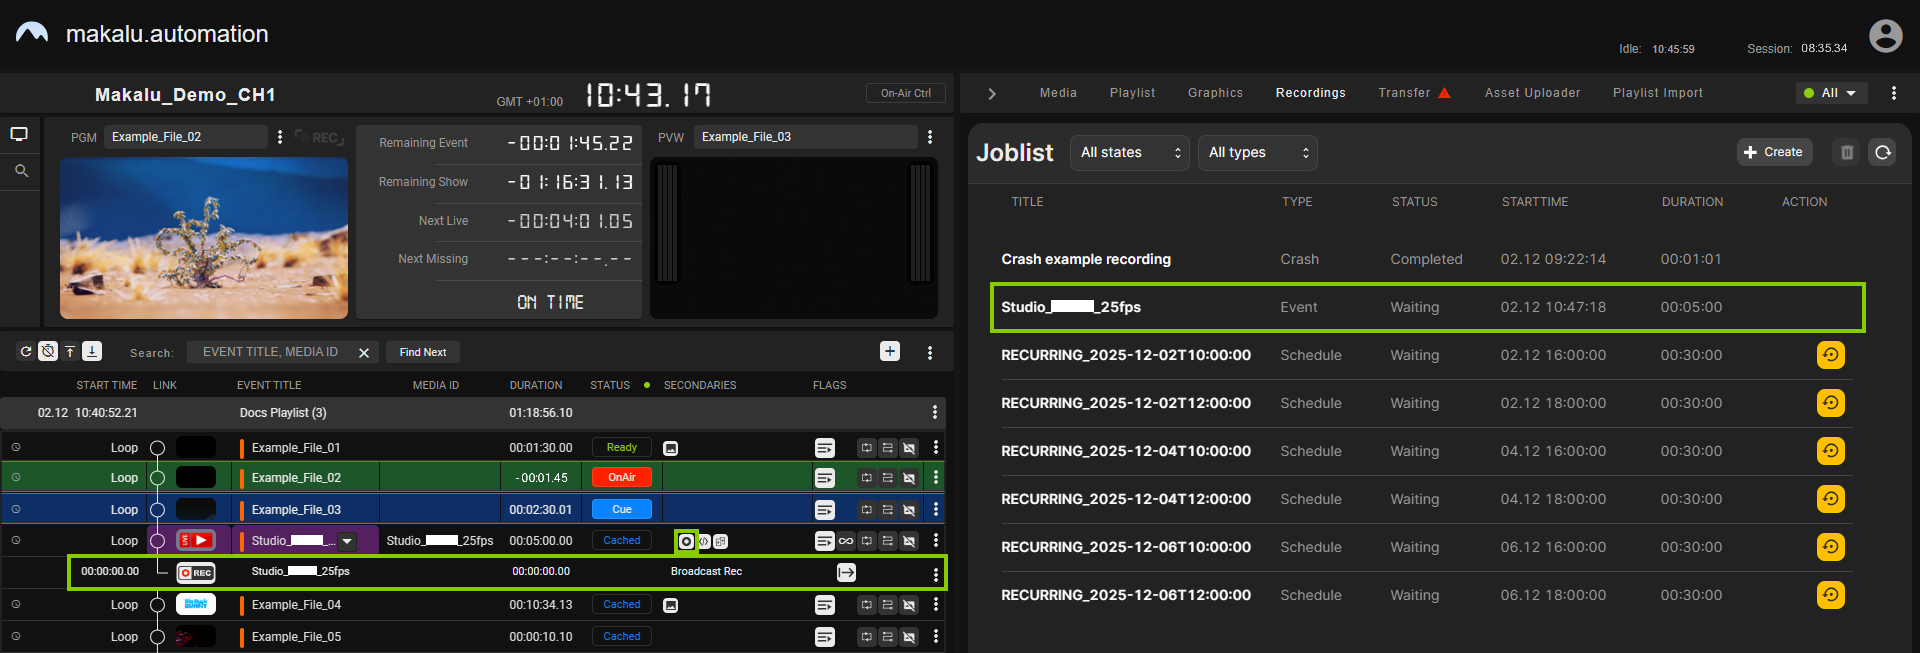
Automation - Recording secondary event added and recording job created Tip
To display detailed information about a recording job, click the Options icon
 on the right of the corresponding row in the job list and select Job info. To jump to and highlight the corresponding live primary event in the rundown, select Link to Event.
 -
(Optional) Edit the properties of the added recording secondary event as follows:
-
If the row with the secondary event details is not displayed below the live primary event in the rundown, click the Recording secondary event icon
in the Secondaries column of the corresponding rundown item.Details about the secondary event expand below.

Automation - Secondary event details -
Click the Options icon
on the right of the secondary event row and select Edit Secondary.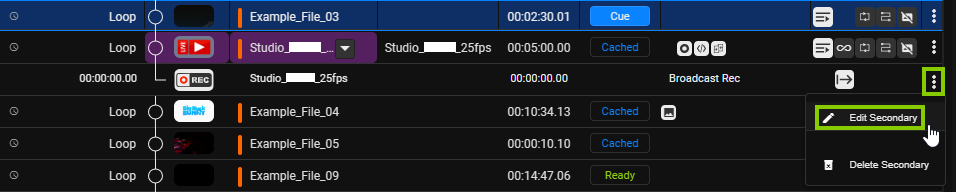
Automation - Open secondary event properties -
In the Edit secondary event menu, edit the properties as required.
Notice
For detailed information about the available recording secondary event properties, see the section Recording properties.
-
Confirm your changes by clicking Apply.
The properties of the recording secondary event are saved. By default (if the properties Start Offset and End Offset are set to 0), the recording job starts automatically when the corresponding live primary event actually starts and stops when it ends (either automatically at the scheduled time or when it is stopped manually by an operator).
-
Creating a crash recording job
Notice
To create a crash job, the optional feature for manually creating recording jobs and the corresponding Create button must be enabled.
To create a crash recording job:
-
On the right, select the Recordings tab.
The recording job list and controls are displayed.
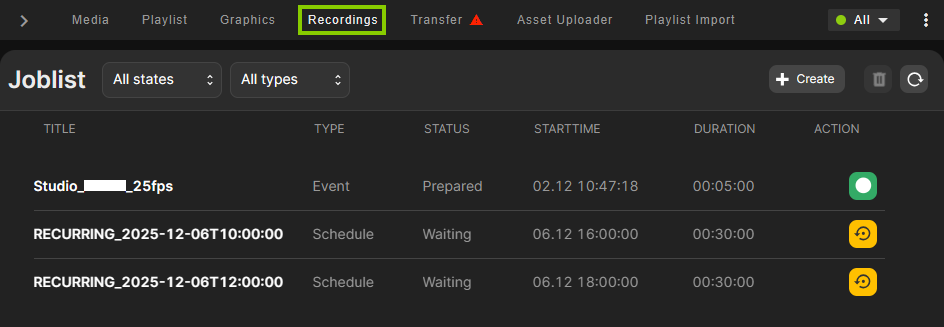
Automation - Recordings tab and job list -
At the top right, click Create.
The Create recording jobs menu opens.
-
Select the Crash tab and set the properties of the recording job as follows:
-
Enter a Title and select the Source to be recorded.
-
(Optional) Enter a Filename and change the Destination and the Profile to be used for the recording.
Notice
If you leave the Filename empty, the Title is also used as the filename.
-
(Optional) If you want to reuse the recording job and create multiple recordings, select Type Multi Shot. To create a single recording, select the default option Type Single Shot.
-
-
Click Apply.
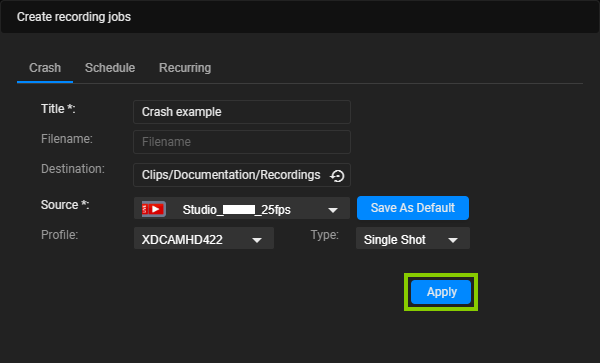
Automation - Create crash recording job -
Close the Create recording jobs menu by clicking Cancel.
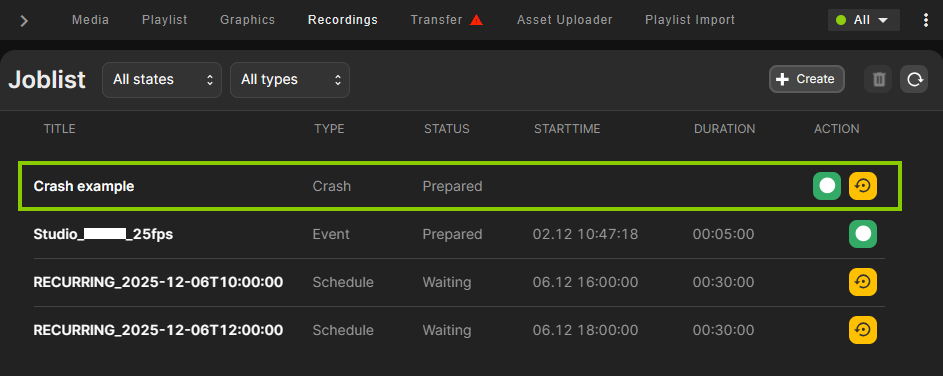
The recording job is created and added to the job list in the Recordings tab. It is announced to and prepared by the recording unit. You can either start or cancel it manually. For more information, see the section Controlling a recording job.
Creating a scheduled recording job
Notice
To create a scheduled job, the optional feature for manually creating recording jobs and the corresponding Create button must be enabled.
To create a scheduled recording job:
-
Repeat steps one to four as described in section Creating a crash recording job, but instead of the Crash tab, select the Schedule tab in the Create recording jobs menu.
-
Select a Start date and time for the recording that does not overlap with other recording jobs already scheduled.
-
Select an End date and time for the recording that does not overlap with other recording jobs already scheduled.
-
(Optional) If you want to enter a duration instead of a specific start and end time, enable the toggle switch to the right of the end time and enter the duration in the corresponding field.
-
(Optional) Alternatively, you can create a scheduled recording job without specifying an end time by selecting Open end.
Notice
When Open end is enabled and the scheduled recording job starts, the recording either continues until you stop it manually or until the system's maximum recording duration is reached. This duration is configurable and set to 6 hours by default.
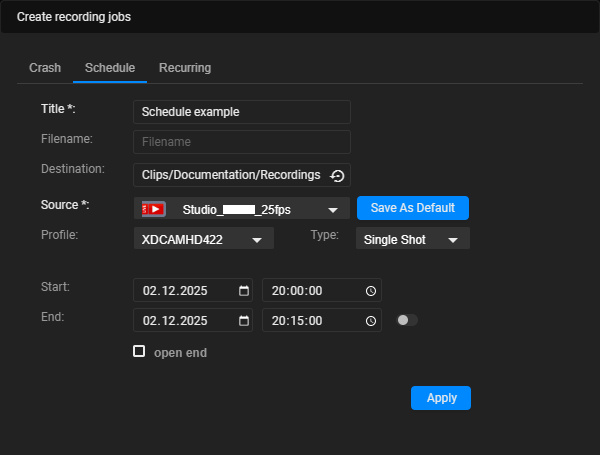
Automation - Create scheduled job -
Click Apply.
Notice
A collision detection then checks whether there are any overlaps with other recording jobs that have already been scheduled. If an overlap is detected, a warning message is displayed, and the new recording job cannot be created. In this case, select a different recording period without any overlaps and then click Apply again. Note that there must be at least a 1-minute pause between two recording jobs.
-
Close the Create recording jobs menu by clicking Cancel.
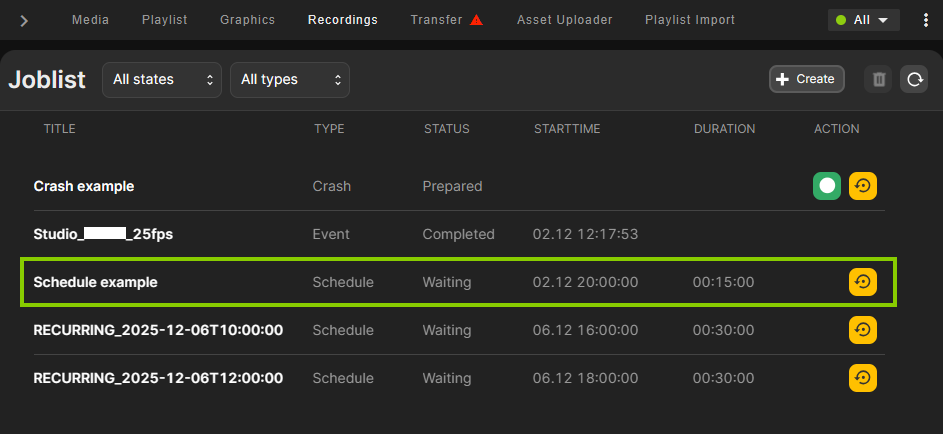
The recording job is created and added to the job list in the Recordings tab. It starts automatically based on the selected start date and time. Depending on your selected end settings, the recording stops either automatically based on the selected end date and time or manually, for example, when you enable Open end and an operator stops the recording.
Creating a recurring recording job
Notice
To create a recurring job, the optional feature for manually creating recording jobs and the corresponding Create button must be enabled.
To create a recurring recording job:
-
Repeat steps one to four as described in section Creating a crash recording job, but instead of the Crash tab, select the Recurring tab in the Create recording jobs menu.
-
Set the validity period of the recording job by selecting a Start date and time as well as an End date and time.
-
Use the Recurring options to specify on which days of the week the recording job should be executed:
-
To create a recording job that is executed every day, select Daily.
-
To create a recording job that is executed only on specific weekdays, select one or more days of the week.
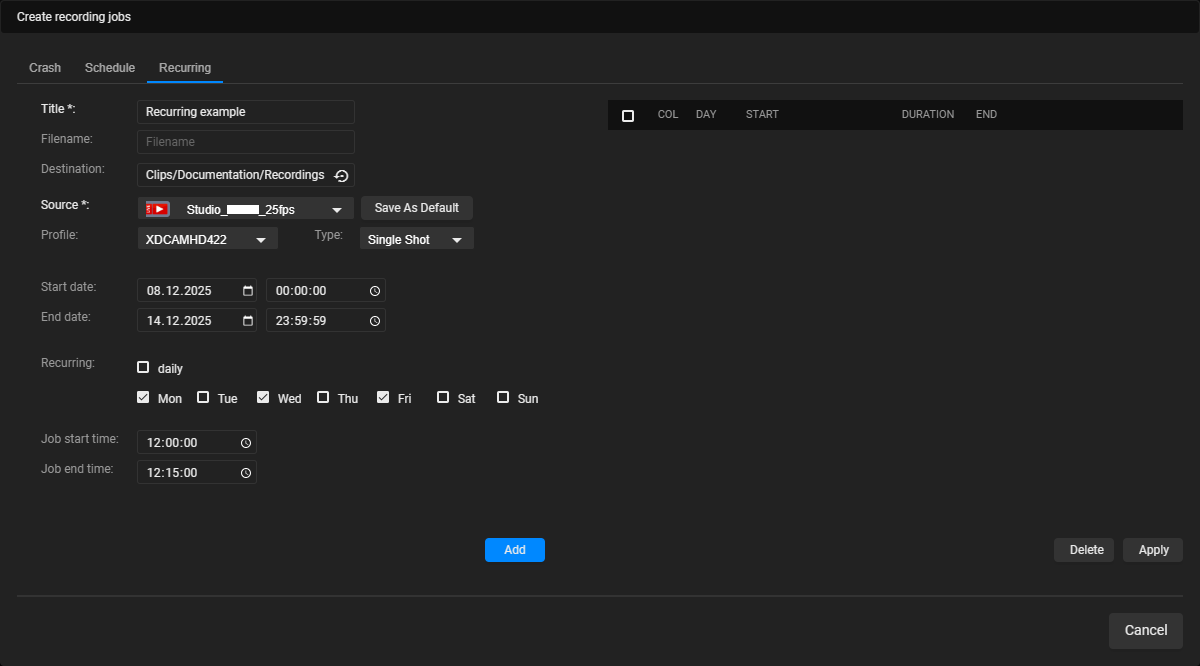
Automation - Create a recurring recording job -
-
Select a Job start time and a Job end time for the recording that does not overlap with other recording jobs already scheduled.
-
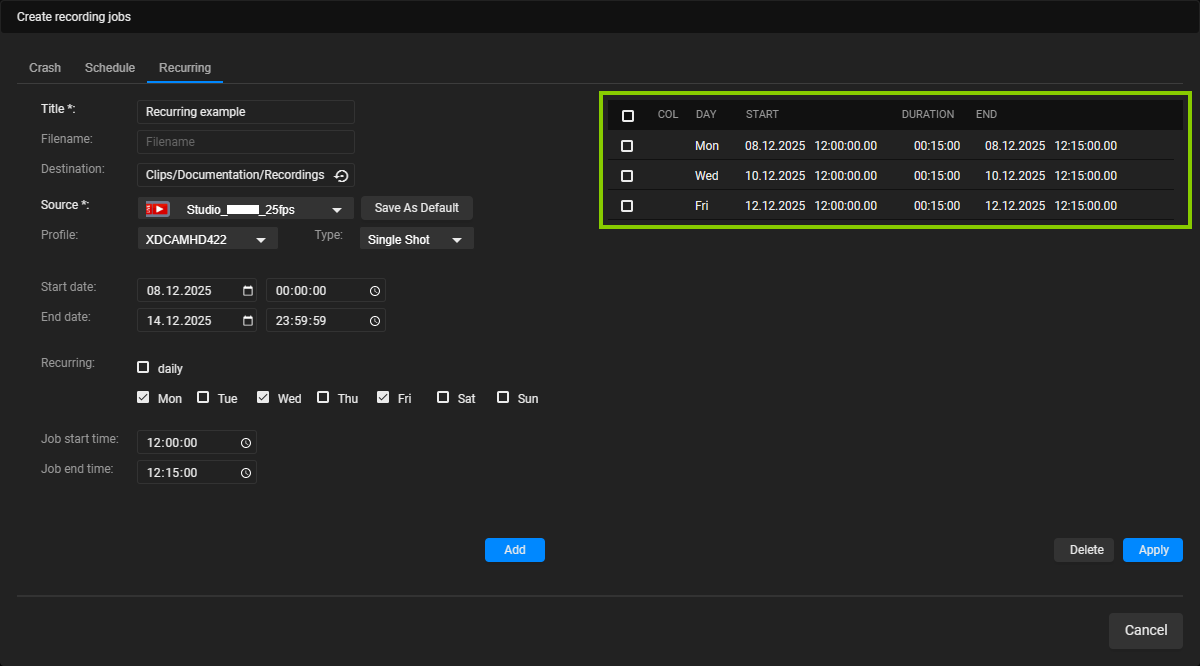
Click Add.
Based on your settings, all corresponding recording jobs are added to the preview list on the right.
Automation - Recording jobs added to the preview list Tip
You can edit the preview list and delete individual recording jobs. To do this, select the jobs to be deleted in the preview list and click Delete.
Notice
A collision detection then checks whether there are any overlaps with other recording jobs that have already been scheduled. If an overlap is detected, a warning message is displayed, and the new recording job(s) cannot be created. In this case, select the overlapping jobs in the preview list and remove them by clicking Delete.
-
(Optional) Repeat steps 3 to 5 to add recording jobs with different time settings to the preview list.
-
Click Apply.
-
Close the Create recording jobs menu by clicking Cancel.
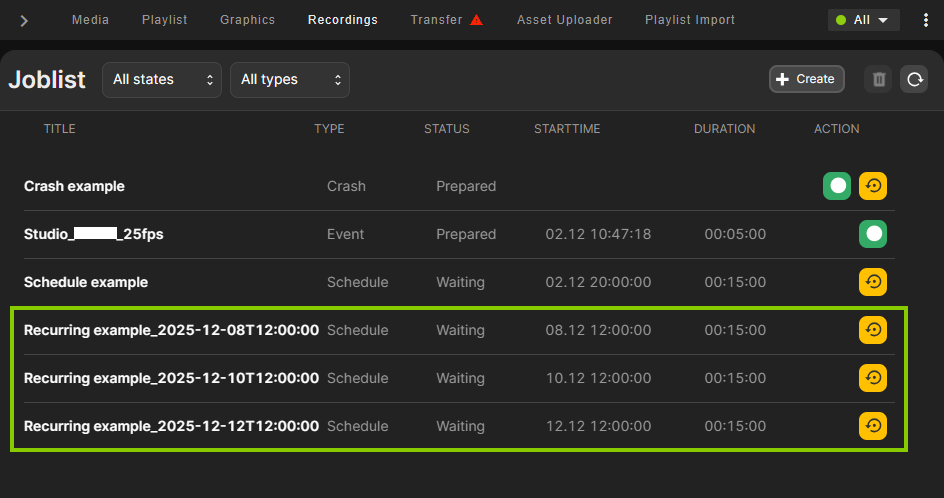
The recording jobs are created and added to the job list in the Recordings tab. Each job starts automatically based on the selected start date and time. Depending on your selected end settings, the recording stops either automatically based on the selected end date and time or manually, for example, if an operator stops the recording.
Controlling a recording job
In the Recordings area, the list of available recording jobs is displayed. You can control a recording job using the icons in the Action column of the job list.
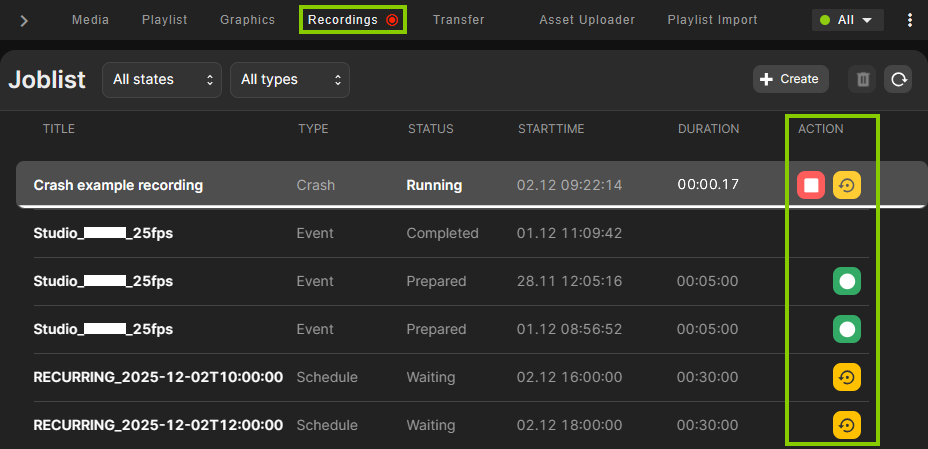
The following actions are available:
| Icon | Action |
|---|---|
 | Prepare recording job Notice: This announces the job to the corresponding recording unit, which then prepares the recording. |
 | Cancel a prepared recording job Notice: A cancelled recording job can be prepared again. |
 | Start recording job |
 | Stop recording job |
Tip
To display detailed information about a recording job, click the Options icon ![]() on the right of the corresponding row in the job list and select Job info. For an event-based recording job, you can also jump to the corresponding event in the rundown by selecting Link to Event.
on the right of the corresponding row in the job list and select Job info. For an event-based recording job, you can also jump to the corresponding event in the rundown by selecting Link to Event.
Deleting a recording job
You can delete a recording job either in the Recordings tab or, for an event-based job, in the rundown.
To delete a Crash, Schedule, or Recurring recording job in the Recordings tab:
-
In the Recordings tab, select the recording job to be deleted from the job list.
-
Click the Options icon
on the right of the corresponding row and select Delete. -
Confirm the displayed dialog by clicking Yes.
The recording job is deleted.
Tip
To delete multiple recording jobs at once, hold [Ctrl] or [Shift] and select the corresponding jobs. Then, click the Delete icon  above the job list and confirm the following dialog by clicking Yes.
To remove a recording secondary event from a clip and delete the corresponding event-based recording job:
-
In the rundown, click the Recording secondary event icon
in the Secondaries column of the clip from which you want to remove a recording secondary event.Details about the secondary event expand below.
-
Click the Options icon
on the right of the expanded row and select Delete secondary. -
In the confirmation dialog, click Yes.
The recording secondary event is removed from the clip, and the corresponding recording job is deleted.
Previewing a recorded file
To preview a recorded file, search and select the file in the Media tab, and proceed as described in section Previewing a media asset.