Adding elements to the rundown
Creating a new playlist
In addition to creating playlists using the Makalu Traffic planning component (for long-term/strategic planning), playlists can be created and added to the rundown using the Detailed Channel View (for short-term rundown changes). This feature is intended for transmission (TX) operators and users in comparable roles who need to make short-notice rundown changes.
Notice
Playlists created using the Detailed Channel View of the Makalu Automation can only be used and edited in the Detailed Channel View. They are not available in Makalu Traffic.
To create a new playlist and add it to the rundown:
-
Enable the display of shows in the rundown by clicking the Options icon
 in the toolbar above the rundown and selecting Display shows.
 -
Click the Add playlist icon
 in the toolbar above the rundown.
The Create Playlist dialog opens.
-
Enter and select the playlist properties:
- Enter a Playlist Title.
- Enter a Show Title for the first show to be created and added to the playlist.
- Under Start Time, select the planned start date and time of the playlist.
- (Optional) To use a fixed start time, enable set fix Start Time.
- Under Duration, enter the planned duration of the playlist.
-
Click Create.
The playlist and the show are created with the selected properties and added to the rundown.
-
Expand the show by clicking the Expand icon
 in the link column.
The show is expanded. The planned duration of the playlist is also applied to the show.
Tip
You can use the expanded area below the show as a dropzone for adding available media to the show via drag and drop.
-
Add media to the show from the Media or Playlist tab. To do this, you can either:
- Add media (primary events),
- Add media segments,
- Add secondary events, and/or
- Add items from an existing playlist.
Notice
If you used a fixed start time when creating the playlist, the selected time will be applied to the first primary event added to the show.
The remaining time of the show to be filled is updated accordingly in the Duration column.
-
Repeat step six until the show is completely filled or has reached the required duration.
Notice
Makalu provides an optional display feature that highlights shows in different colors when the total duration of added clips differs from the planned duration of the show.
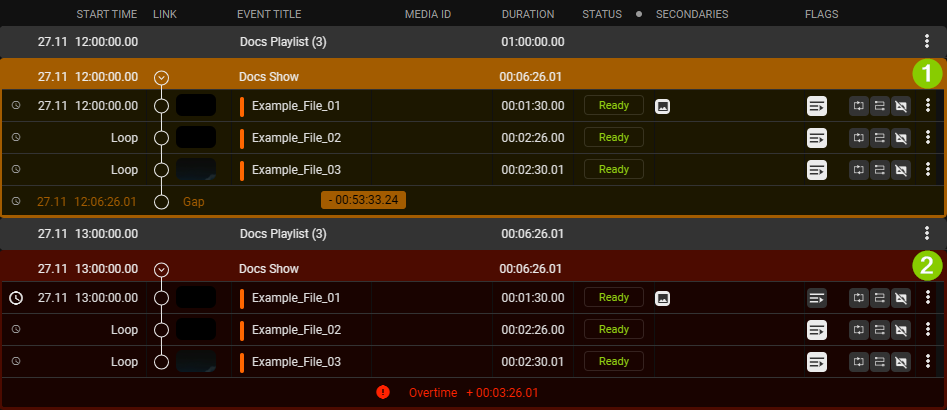
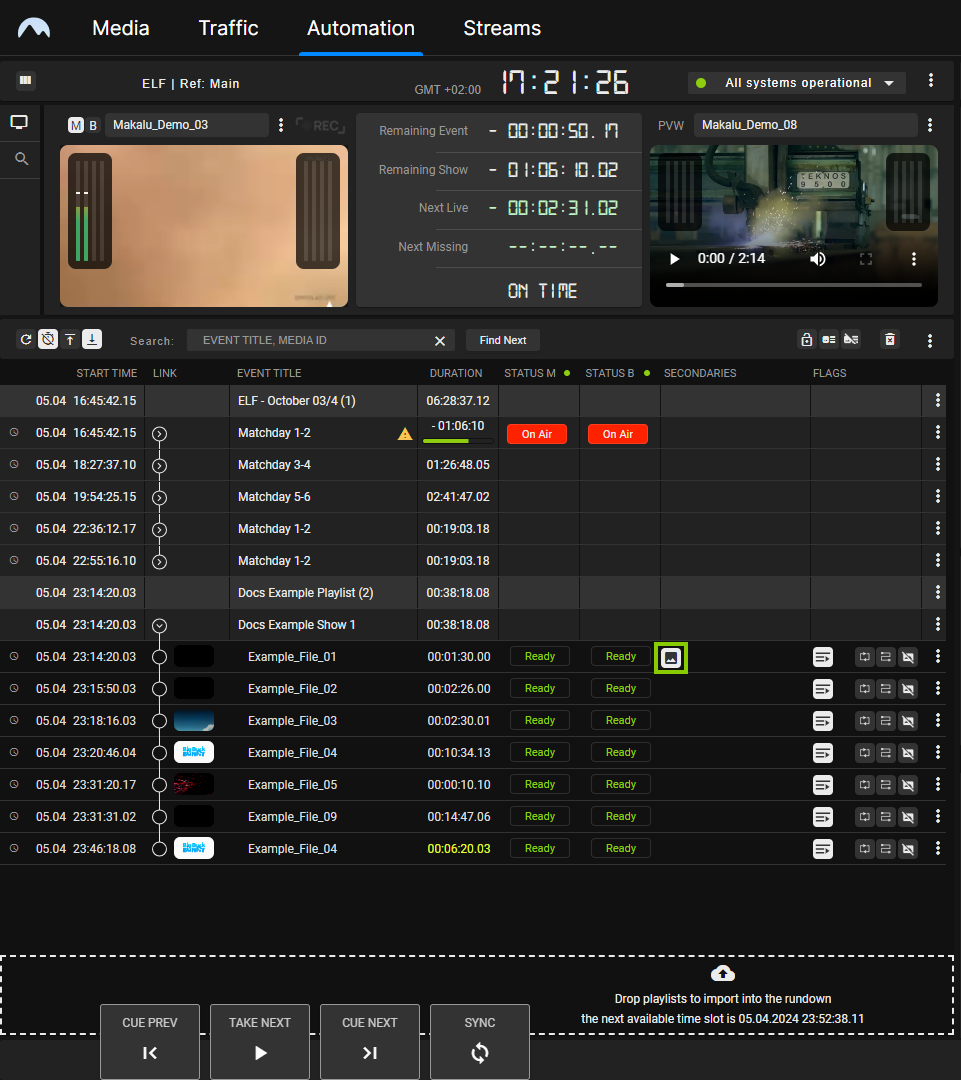
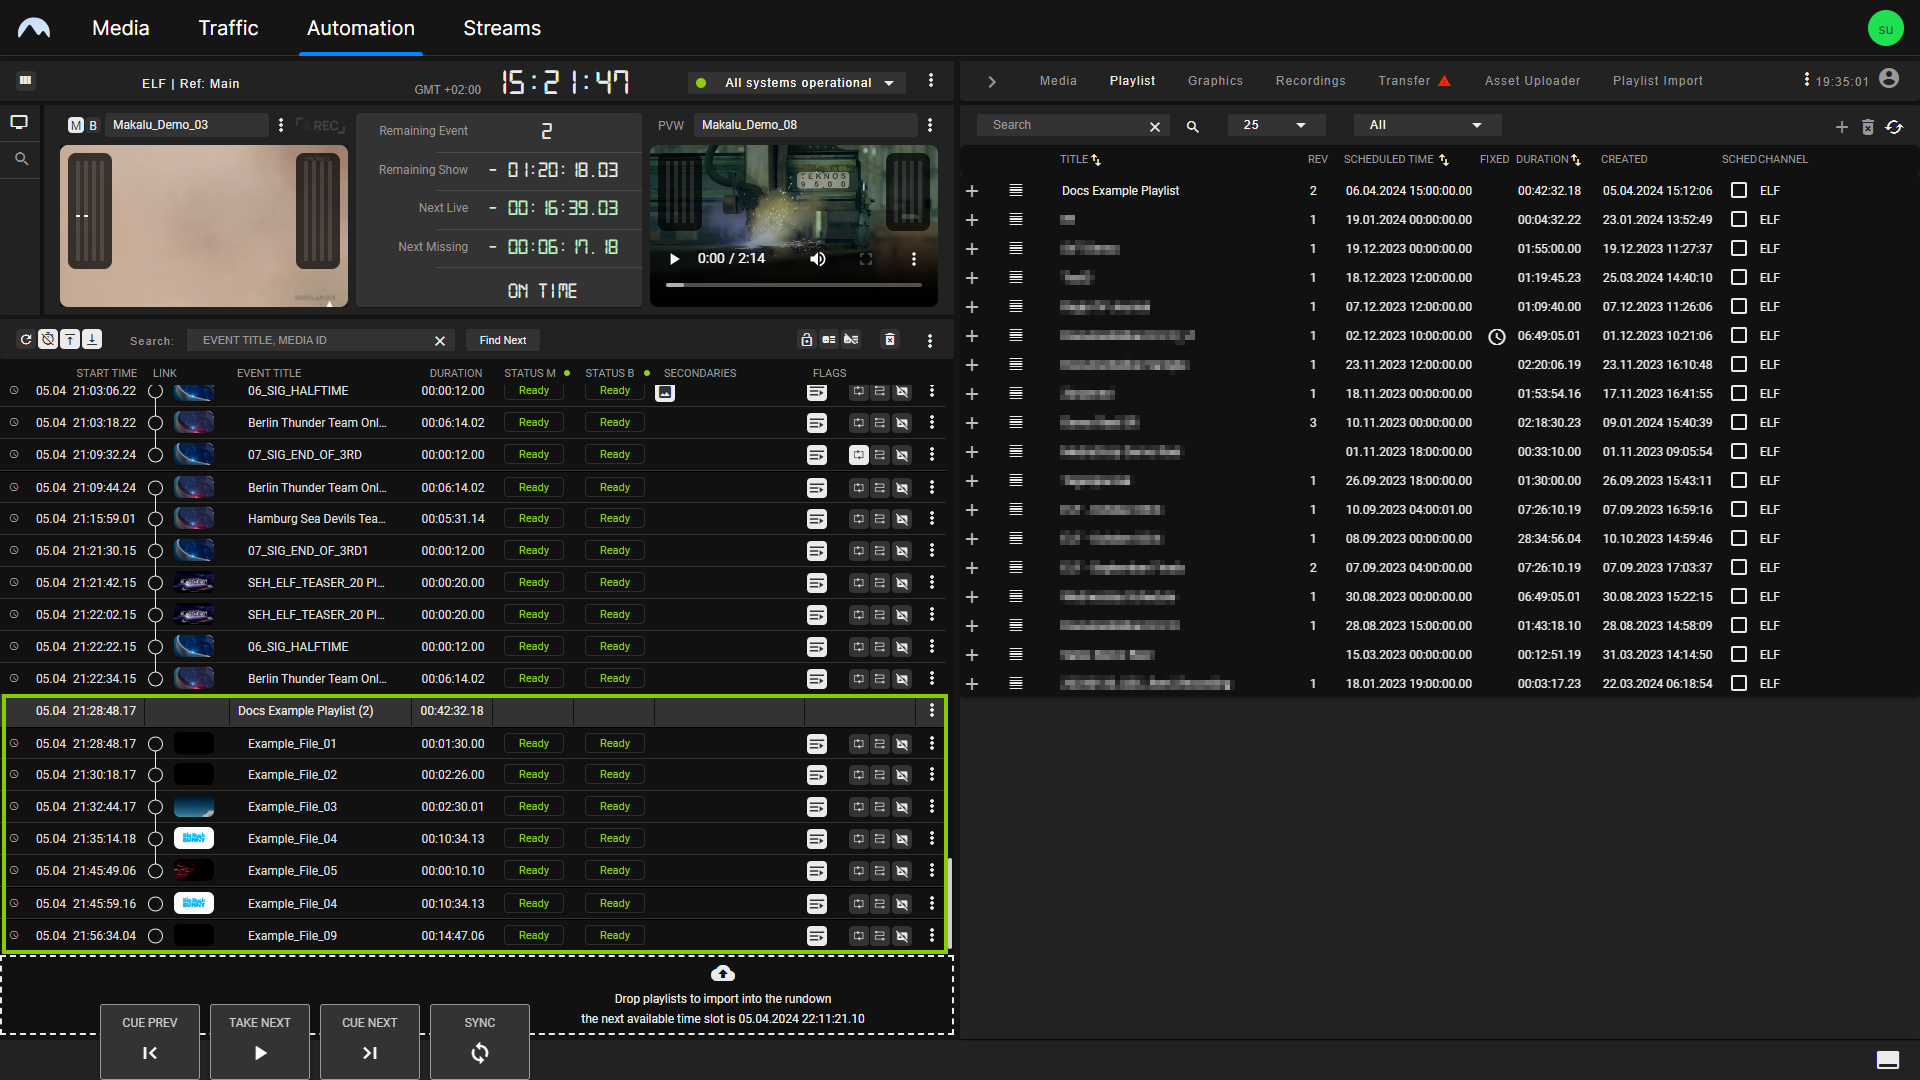
Automation - Show planned duration not reached/exceeded If this feature is enabled, and a show's planned duration is not reached ("undertime"/gap), it is highlighted in orange (1). This also applies to each newly created show because it is initially empty and does not contain any clips yet. Therefore, the remaining time to be filled matches the planned duration of the show and is listed as a gap and highlighted in orange. If a show's planned duration is exceeded ("overtime"), it is highlighted in red (2).
-
(Optional) Add more shows to the playlist by following the steps described in the section Creating a new show, and add media to it by repeating step six.
-
(Optional) To save the playlist for reusing it at a later time:
-
Click the Options icon
of the playlist and select Save as.The Create Playlist dialog opens.
-
Enter a Title for the playlist.
-
Click Apply.
The playlist is saved. It can be added to the rundown using the Playlist tab.
-
Creating a new show
You can create a new show and insert it after an existing show in the rundown.
Notice
Shows created in the Detailed Channel View of the Makalu Automation can only be used and edited in the Detailed Channel View. They are not available in Makalu Traffic.
To create a new show:
-
Enable the display of shows in the rundown by clicking the Options icon
in the toolbar above the rundown and selecting Display shows. -
Click the Options icon
of the show after which you want to insert the new show and select Add show.The Create Show dialog opens.
-
Enter and select the show properties.
- Enter a Show Title.
- Under Start Time, select the planned start date and time of the show.
- (Optional) To use a fixed start time, enable set fix Start Time.
- Under Duration, enter the planned duration of the show.
-
Click Create.
The show is created with the selected properties and added to the rundown at the selected position.
Adding media to the rundown
In addition to playlists, you can also add media assets (video files, secondary events, live sources, or placeholders) to the rundown by adding them to a show in a playlist.
To do this, follow these steps:
-
(Optional) To expand a show, click the corresponding Expand icon
in the link column.The show is expanded, and all included clips are listed.
-
On the right, select the Media tab.
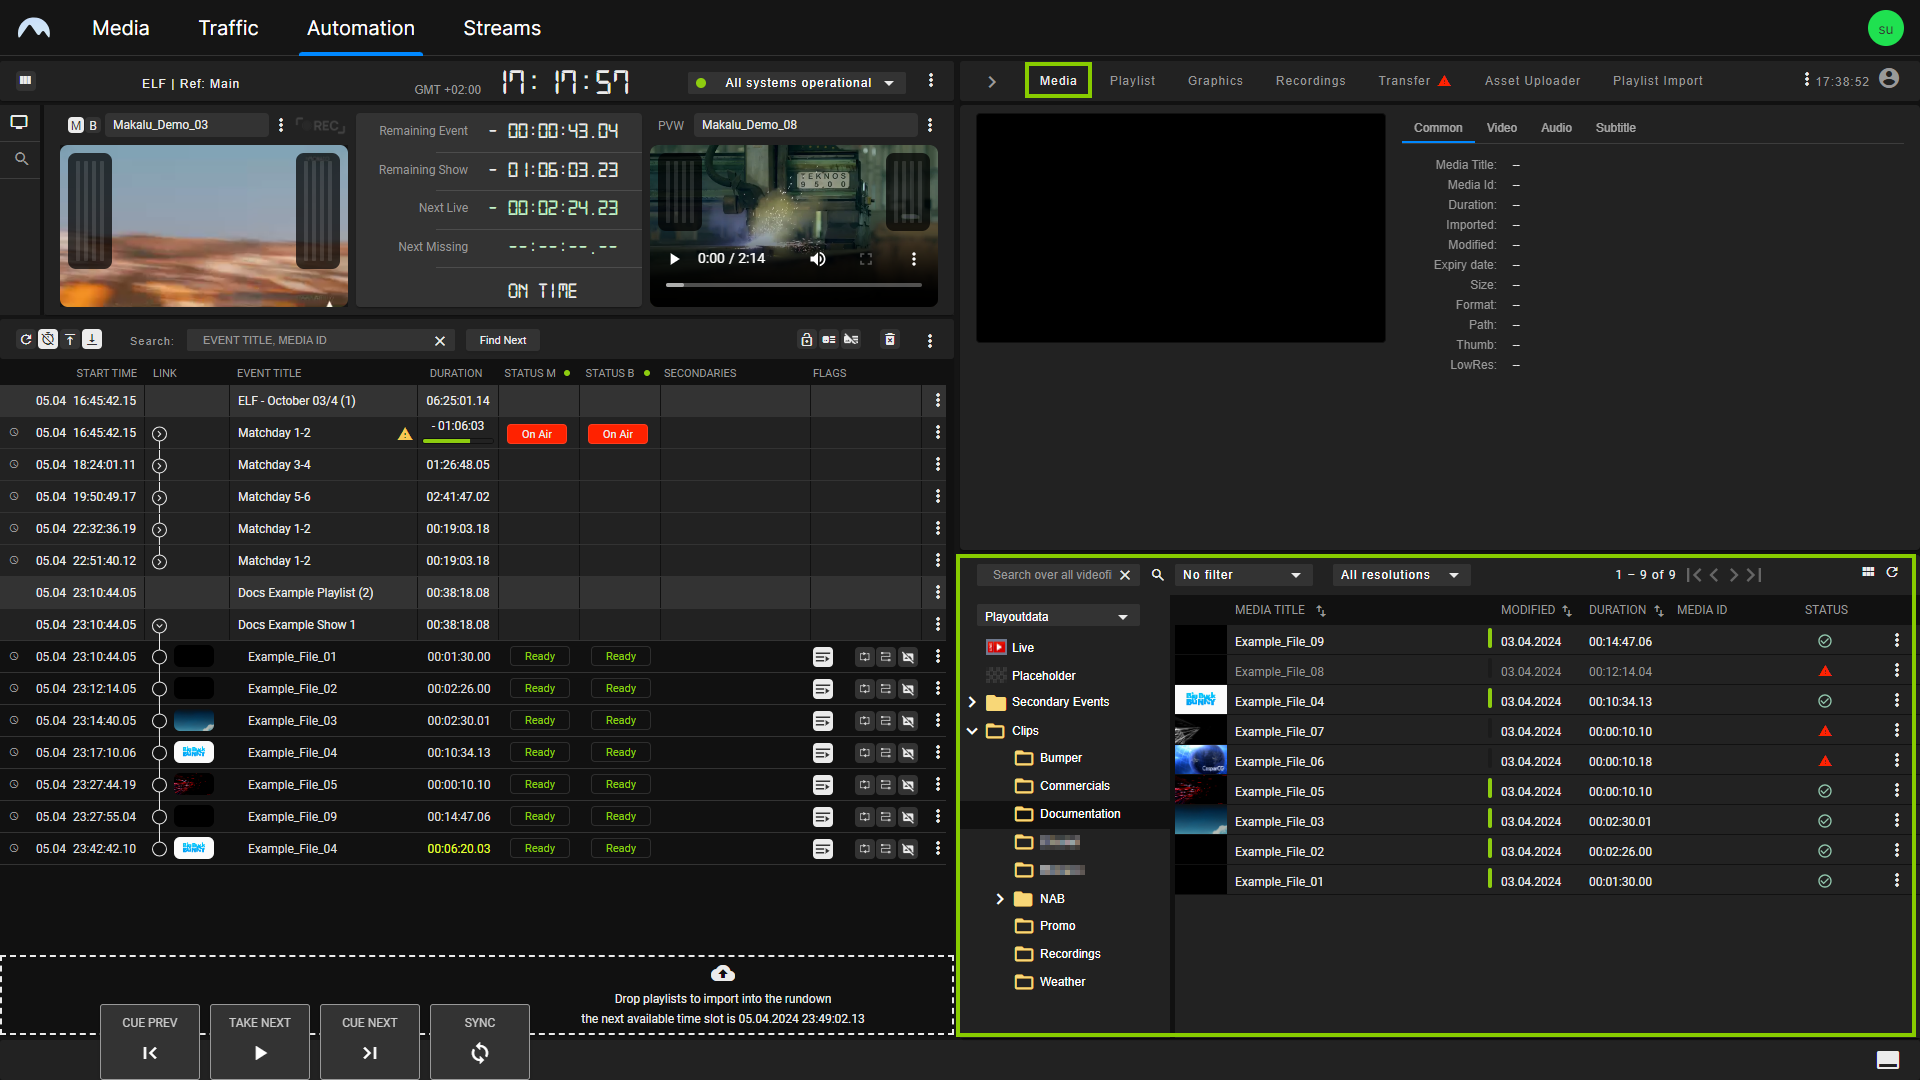
Based on your access permissions, all available media assets are listed in the media list.
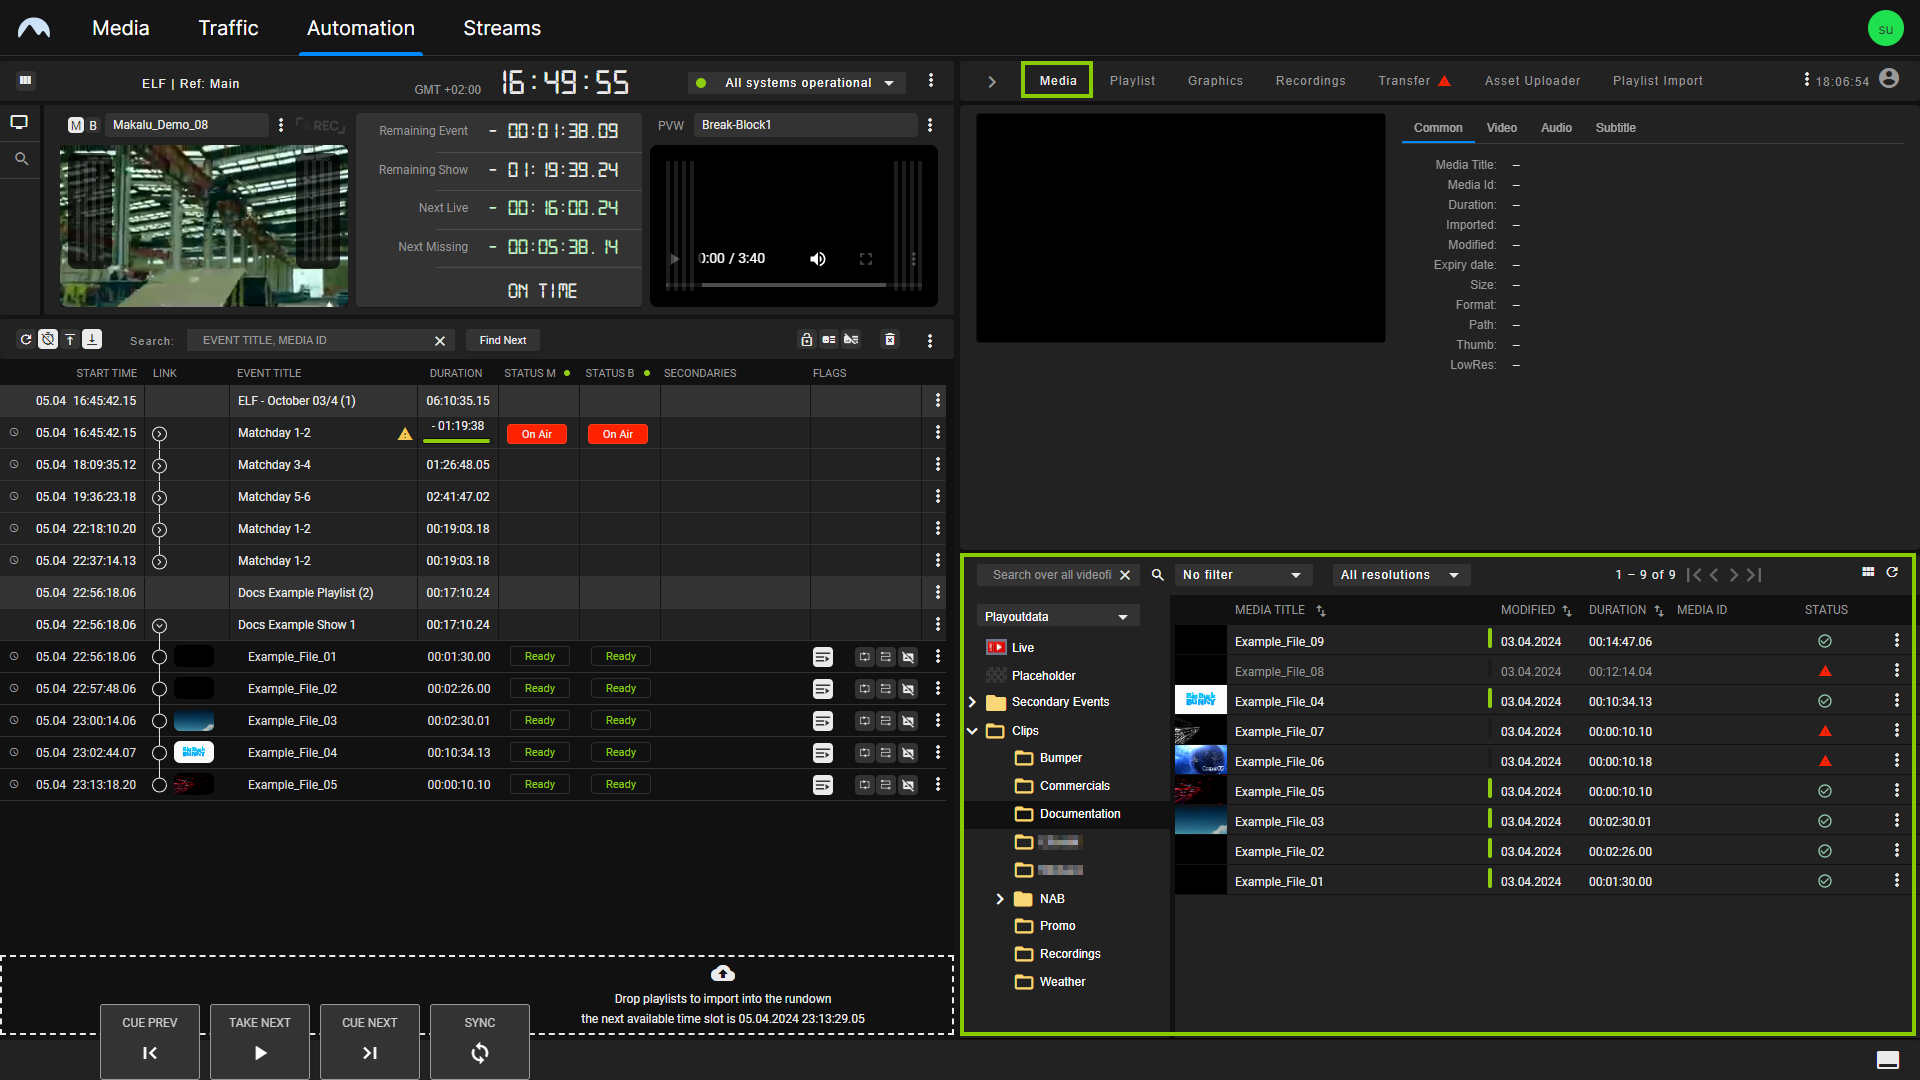
Automation - Show expanded and media tab opened -
Select one or more media assets (video files, live sources, or placeholders) from the media list on the right and add them to a show in the rundown on the left via drag and drop.
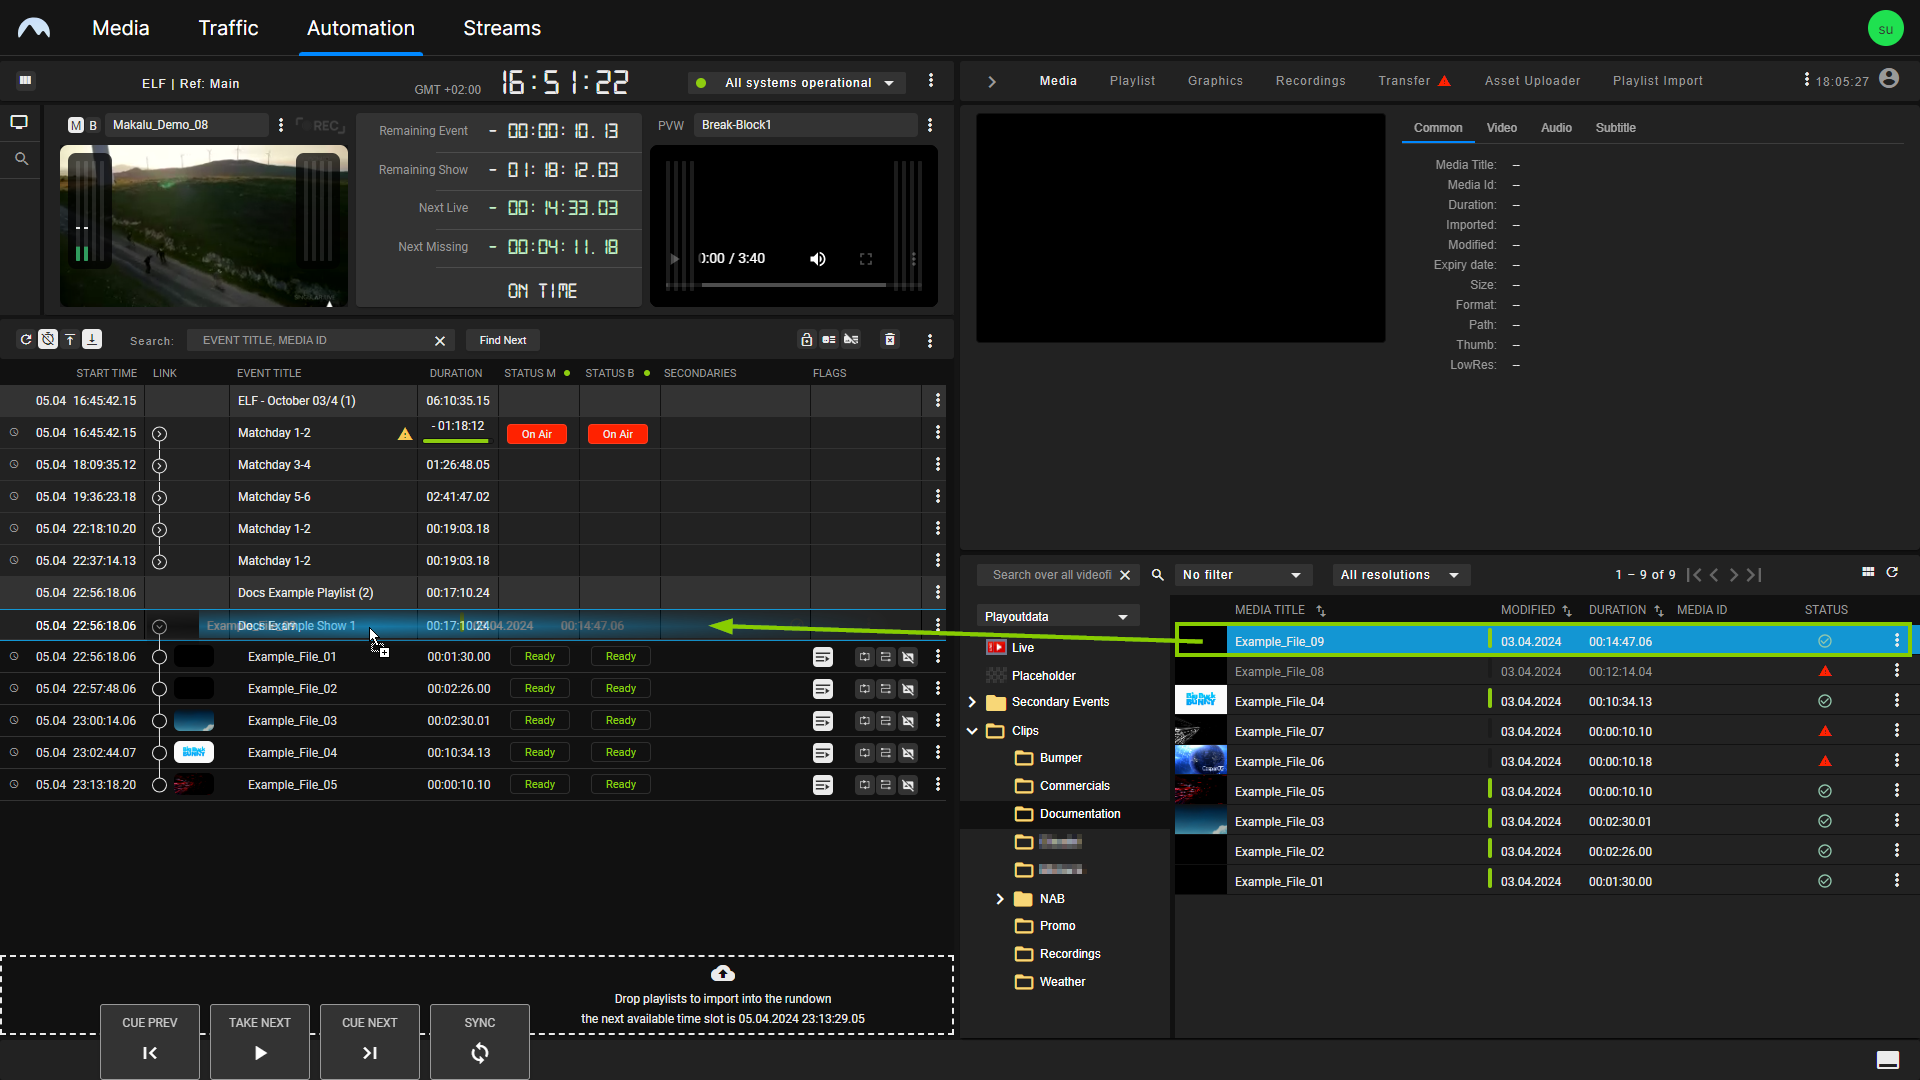
Automation - Add media assets to a show Notice - Checking resolutions and framerates
When adding a video file media asset to the rundown, its resolution and framerate should usually match the channel output properties exactly. For example, if you use a channel that is configured for 1080p and 25 fps output, you should use files with a resolution of 1920 x 1080 px and a framerate of 25 fps.
Video files with properties that differ from the current channel output configuration are displayed with a gray font color in the media list and a red warning icon in the Status column. When you hover your mouse over this icon, additional status details are displayed, including information about resolution and framerate. In this case, one or both of these display properties are displayed as incorrect.
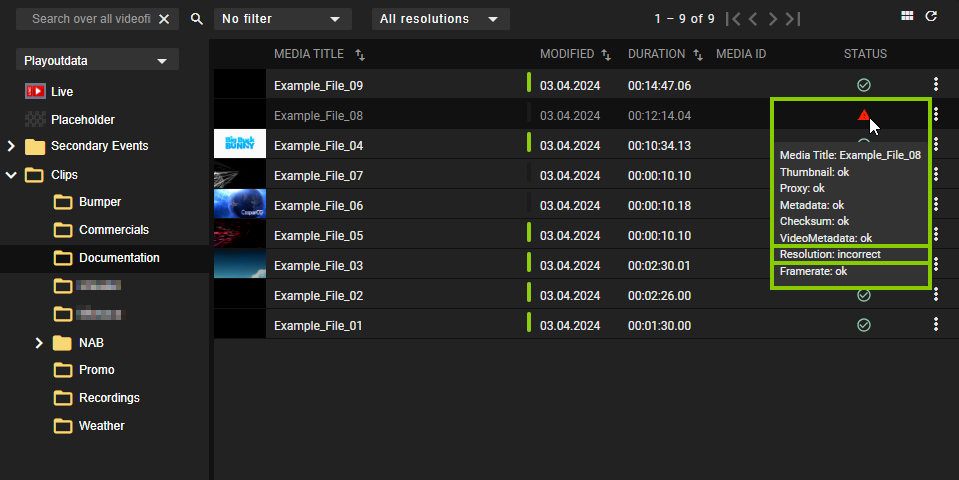
Automation - Video files with resolutions and framerates that do not match the channel output properties By default, you cannot add video files that use other resolutions and/or framerates than the current channel output configuration.
Notice - Adding consecutive SRT live sources
If you want to add multiple consecutive SRT live sources (without any file-based clips in between), you must add them alternately from the live source SRT Sets A and B. Both are listed and selectable as separate live source types in the media list. For more information, see the section Playing SRT live sources in A/B mode.
The selected video file, live source, or placeholder is added to the rundown as the last clip of the selected show.
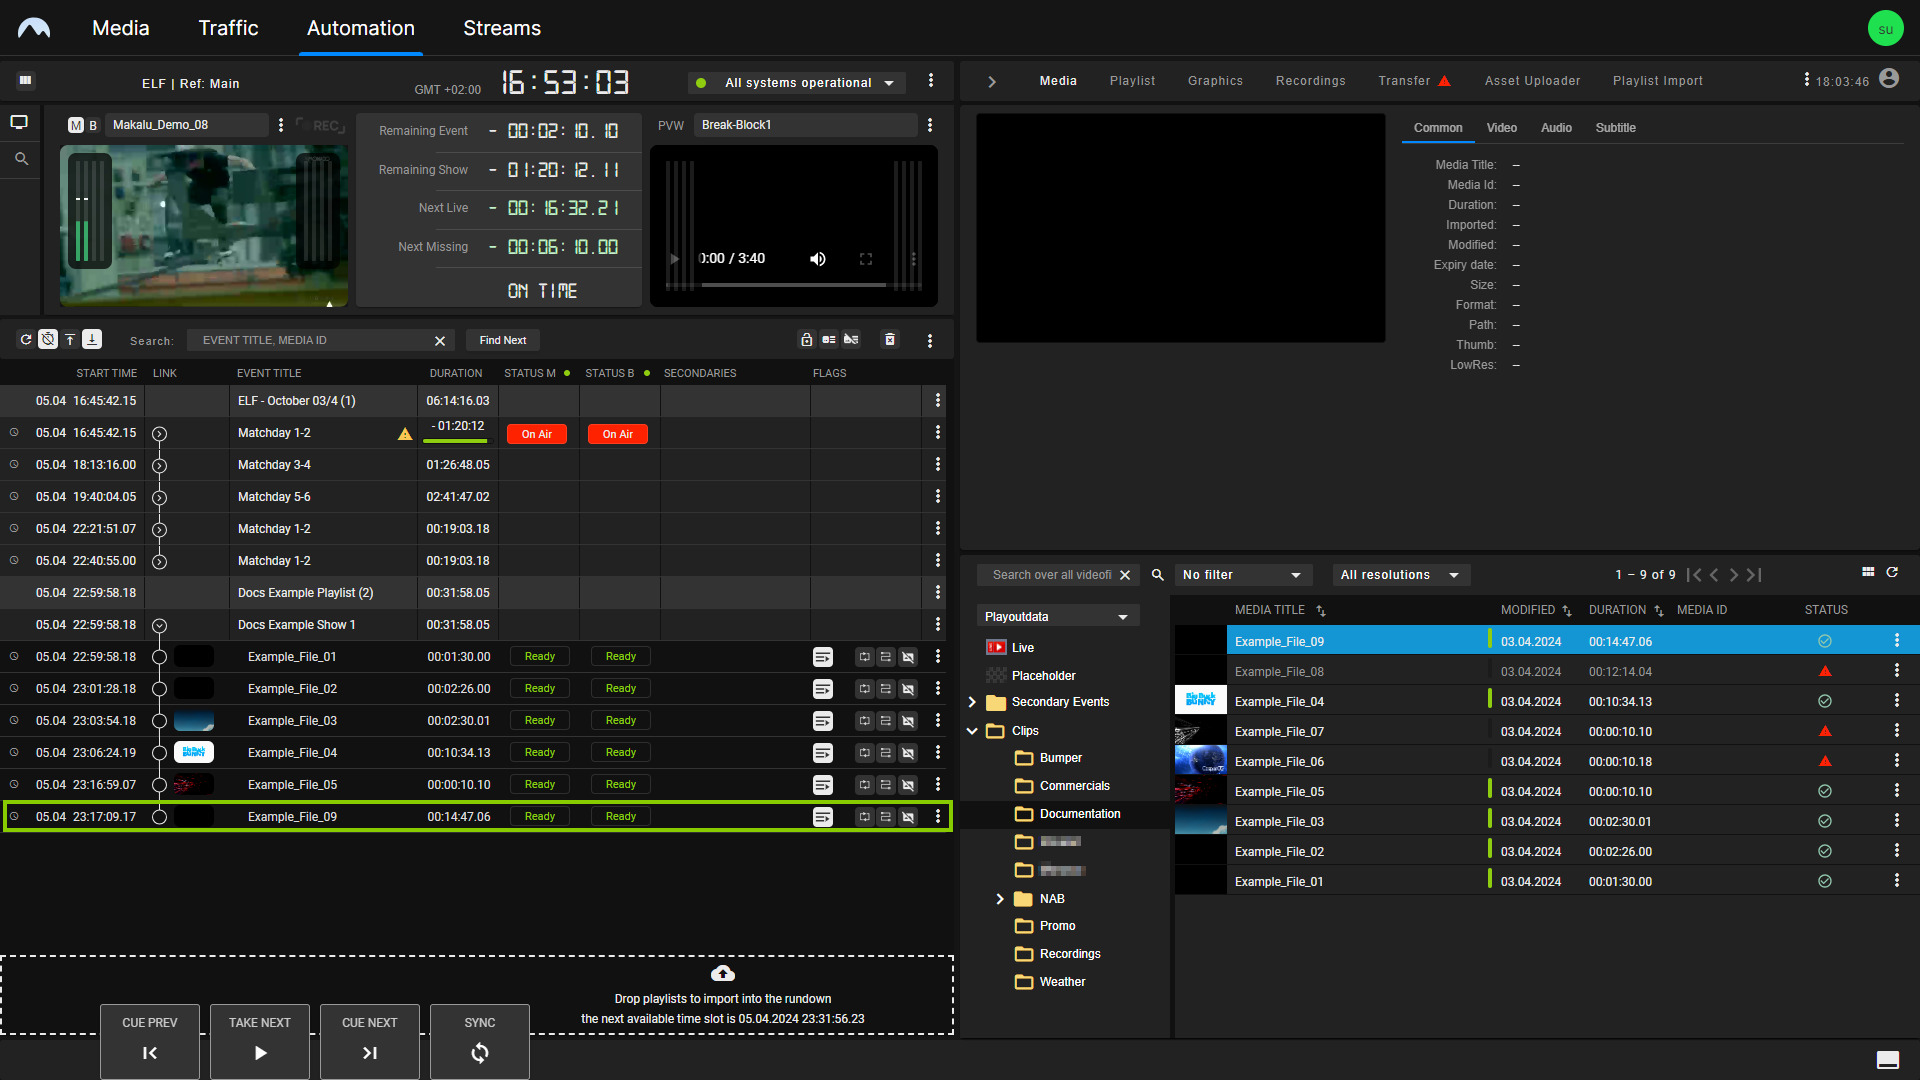
Automation - Video files added to a show Tip - Replacing clips
Instead of adding a clip at the end of a show, you can also replace an individual clip in a show by dragging and dropping one or more new media items directly on the clip to be replaced while holding [Ctrl]. For more information, see the sections Replacing a clip with another media item and Replacing a clip with another playlist item.
To add a new clip before an existing clip in a show, drag and drop the new clip on an existing clip (without holding [Ctrl]).
Notice - File processing and transfer
If an added file is not available on the playout nodes of the channel, file processing and file transfers are automatically initiated, and the corresponding clip is listed as Pending in the rundown. The corresponding file is copied from the ingest storage to all playout nodes that are assigned to the channel. See the section File transfer for more information.
-
(Optional) Change the show’s clip list order to move the added clip to a specific position within the selected show.
Adding secondary events to the rundown
To add a secondary event to the rundown:
-
On the right, select the Media tab.
All available media items are listed in the media list.
Automation - Show expanded and media tab opened -
In the media list, click Secondary Events and select the type of secondary event you want to add.
-
Select a secondary event and drag it on a show or clip in the rundown.
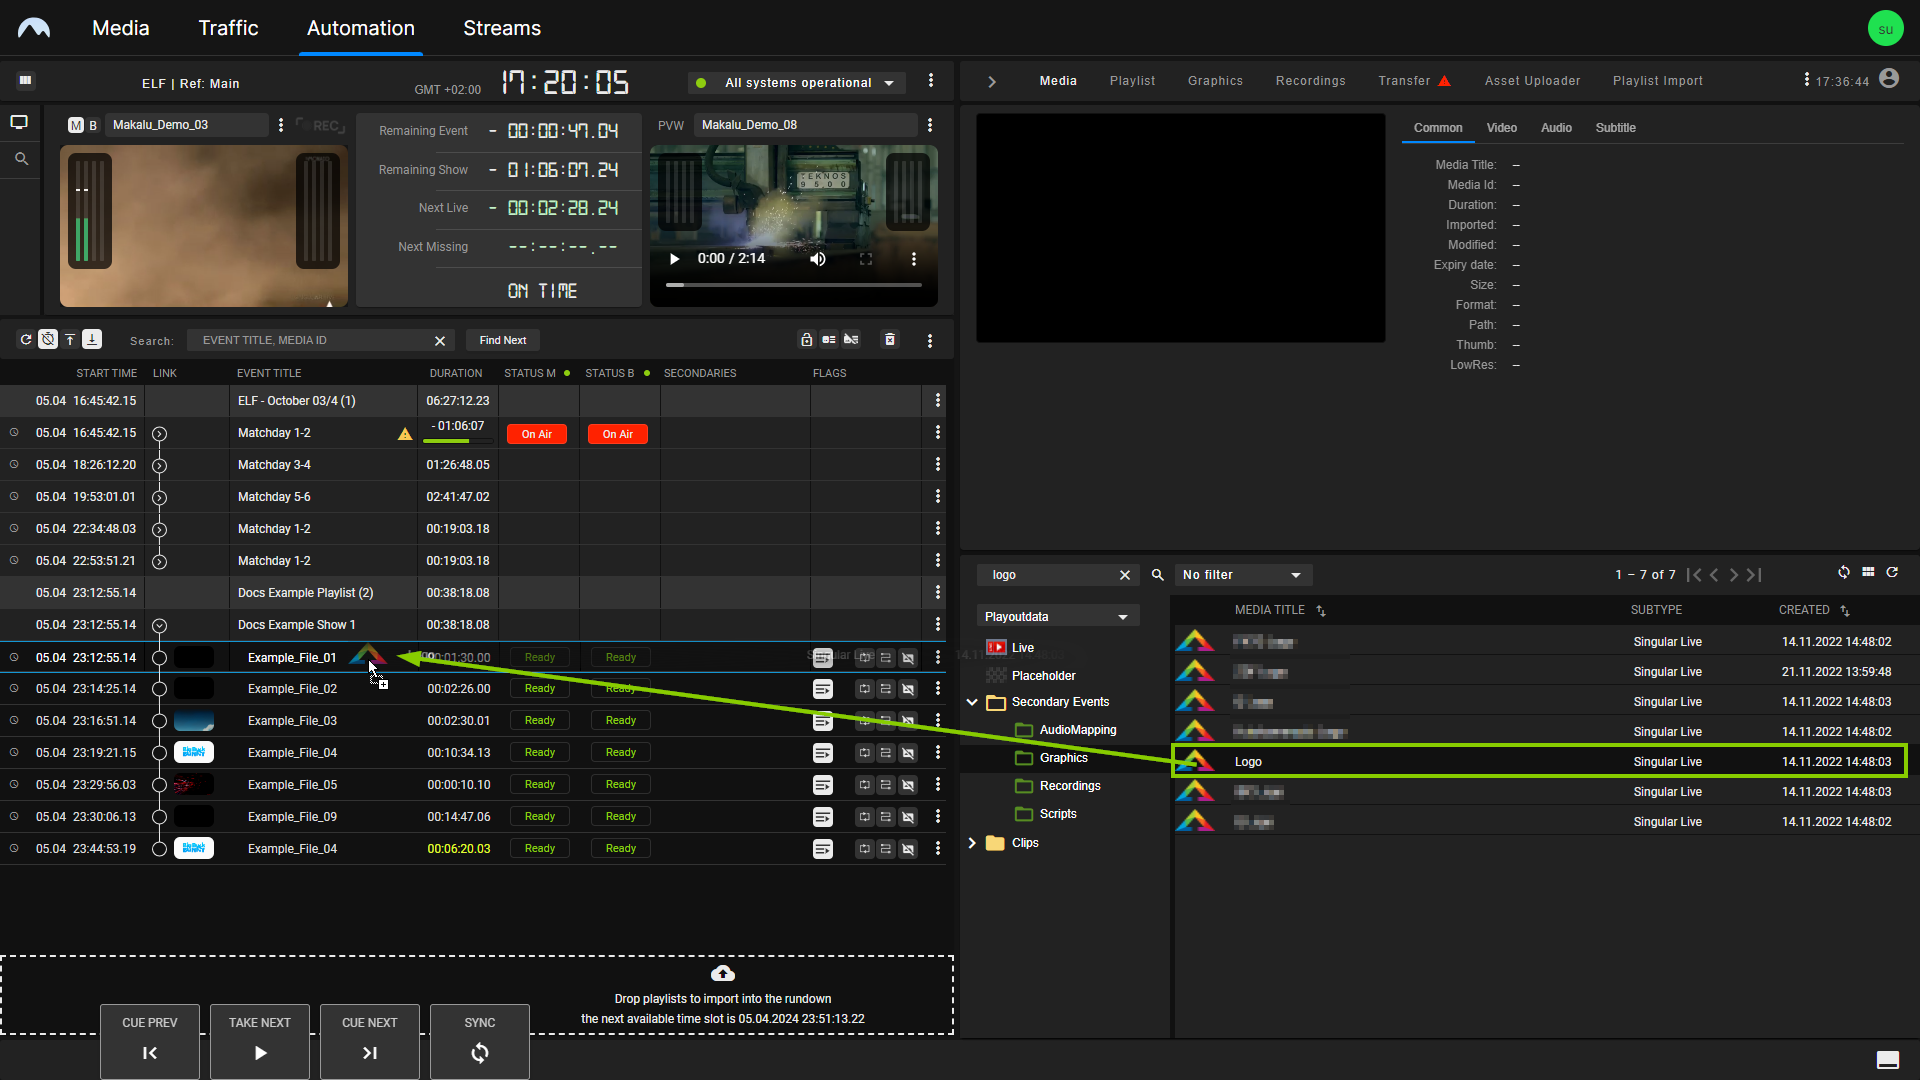
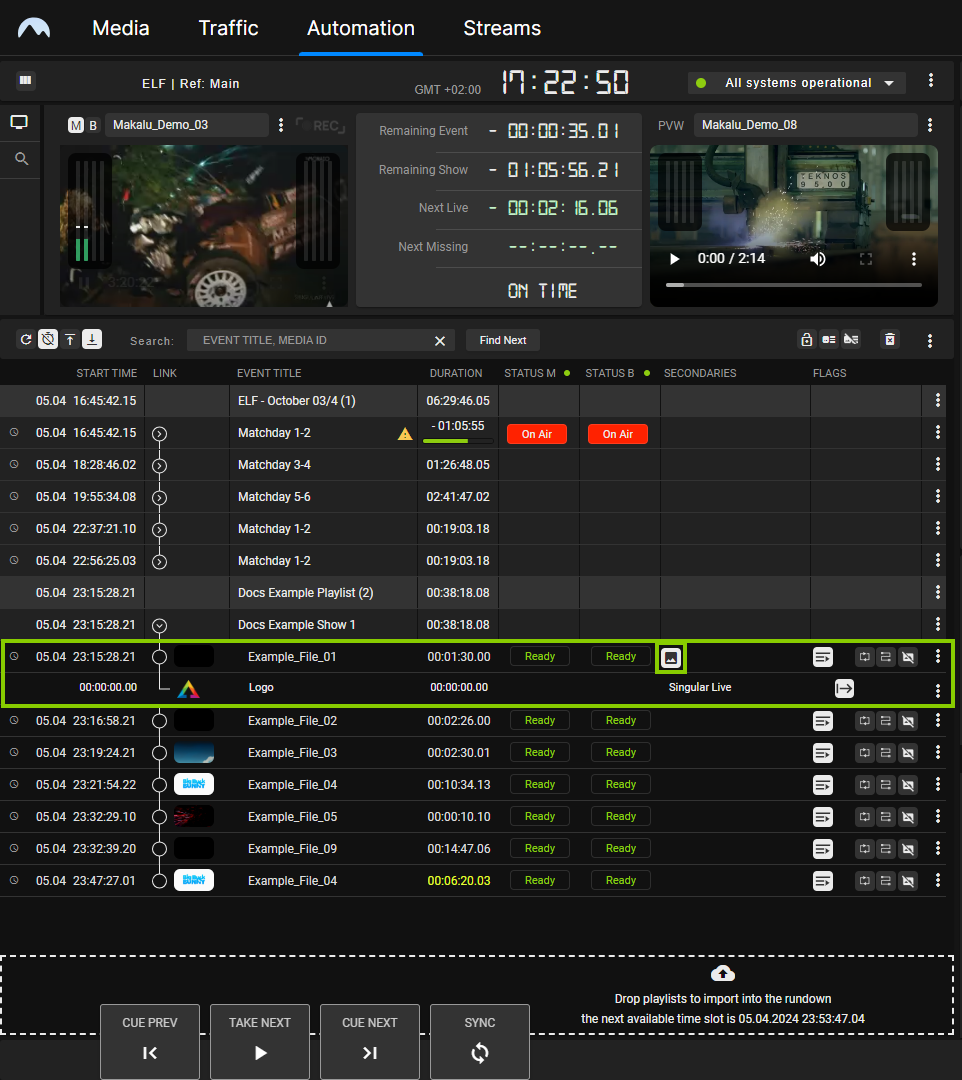
Automation - Secondary event selected Depending on the type of secondary event, a menu may be displayed that requires you to set the properties of the secondary event. For more information about the available properties, see the section Secondary events. After you have set and confirmed the properties, the selected secondary event is added to the show or clip, which is indicated by the corresponding icon in the Secondaries column.
Automation - Secondary event added to a clip Tip
To expand the list of secondary events of a specific type added to a show or clip, click the corresponding icon in the Secondaries column.
Automation - Clip secondary event list expanded -
To add more secondary events, repeat step three.
The selected secondary events are added.
Creating media segments and adding them to the rundown
If you only want to add a specific part of a video file media asset to the rundown, you can trim it to create a segment. This is useful for dividing a longer file (for example, a recording lasting several hours) into smaller parts.
You can create segments in the following ways:
- Temporary (create a segment for one-time usage)
-
Permanent (create a reusable segment)
Notice
Creating a reusable segment does not create a new file on the ingest or playout storage. It only creates a new media asset internally, which references the original asset (using the original file path on the storage) and uses the set mark in and out points as additional metadata.
The basic procedure is mostly identical for creating temporary and permanent segments. Creating a permanent segment requires only a few additional steps.
Temporary segments
To create a temporary segment and add it to the rundown:
Notice
Segments can only be created from media assets that represent actual video files. In the media list, these files are usually listed under Clips in the folder tree. Live and placeholder media assets cannot be trimmed to create segments.
-
In the rundown, select and expand the show to which you want to add a segment.
The show is expanded, and all included clips are listed.
-
On the right, select the Media tab.
All available media items are listed in the media list.
-
In the media list, select the media asset to be used for creating a segment, either by clicking the Options icon
 at the right side of the corresponding list item and selecting Preview asset or by dragging the item on the preview player.
Tip
If segments have already been created for this specific media asset, you can also open it in the preview player by clicking the number in the SEG column. This corresponds to the total number of segments already created for this media asset.
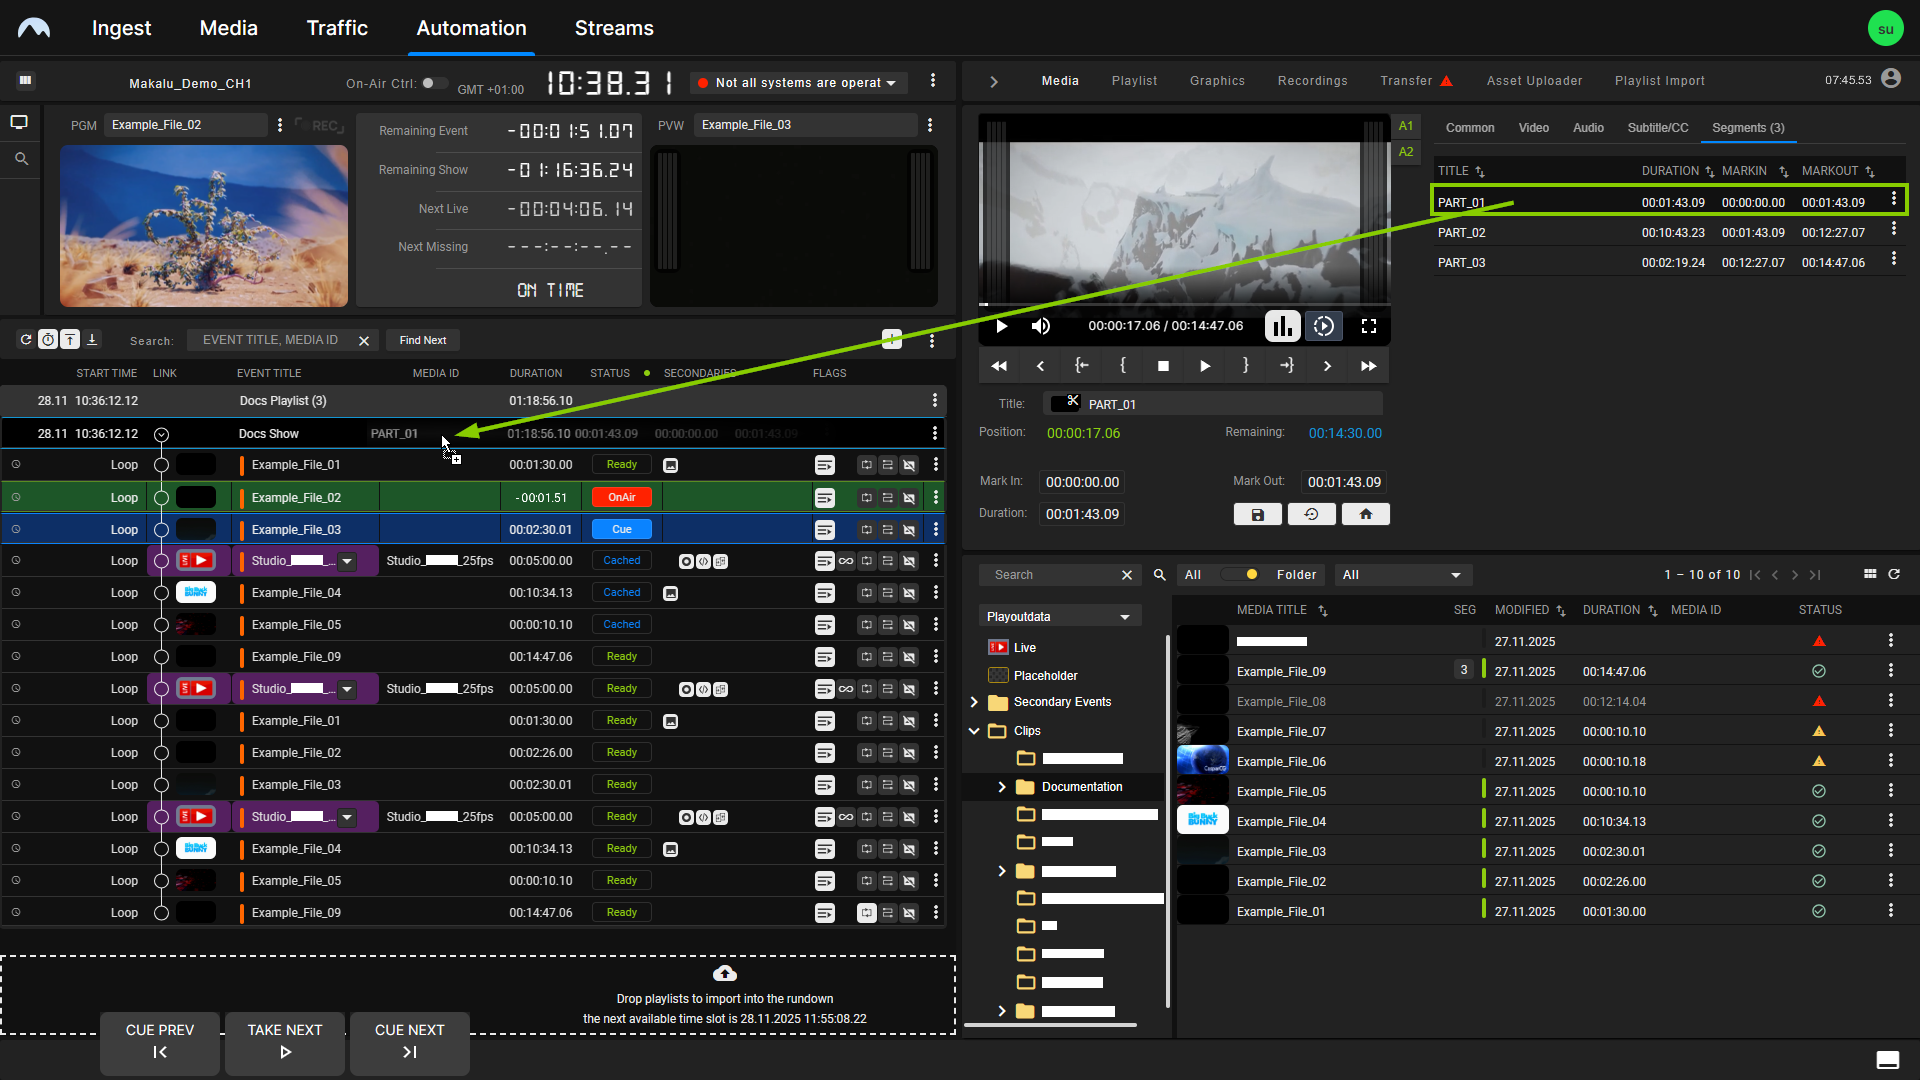
The media asset is opened by the preview player.
-
Use the preview player controls to select the timecode for the mark in.
-
To set the selected timecode as mark in, click the Set Mark In icon
 .
.The Mark In timecode is updated accordingly.
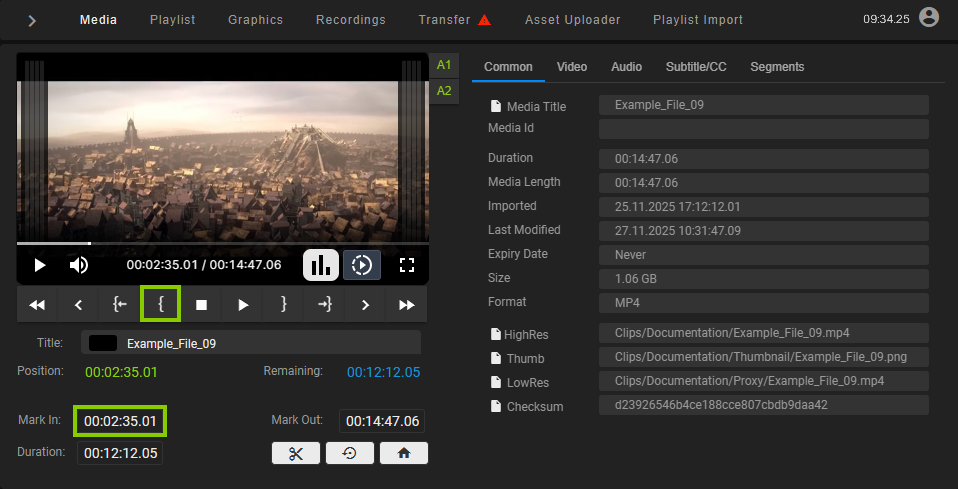
Automation - Media segments - Mark in set -
Use the preview player controls to select the timecode for the mark out.
-
To set the selected timecode as mark out, click the Set Mark Out icon
 .
.The Mark Out timecode is updated accordingly.
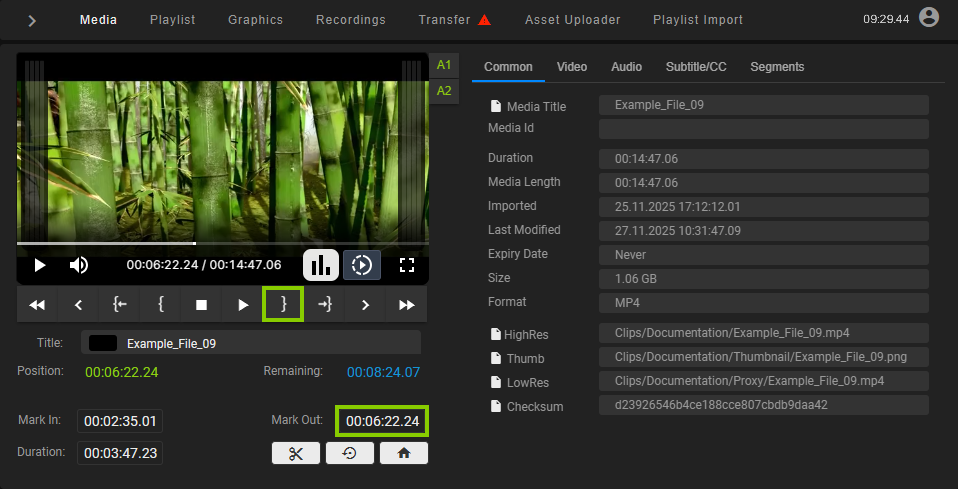
Automation - Media segments - Mark out set -
Use the draggable element below the preview player (consisting of thumbnail and file name) and drag it on the show to which you want to add the segment.
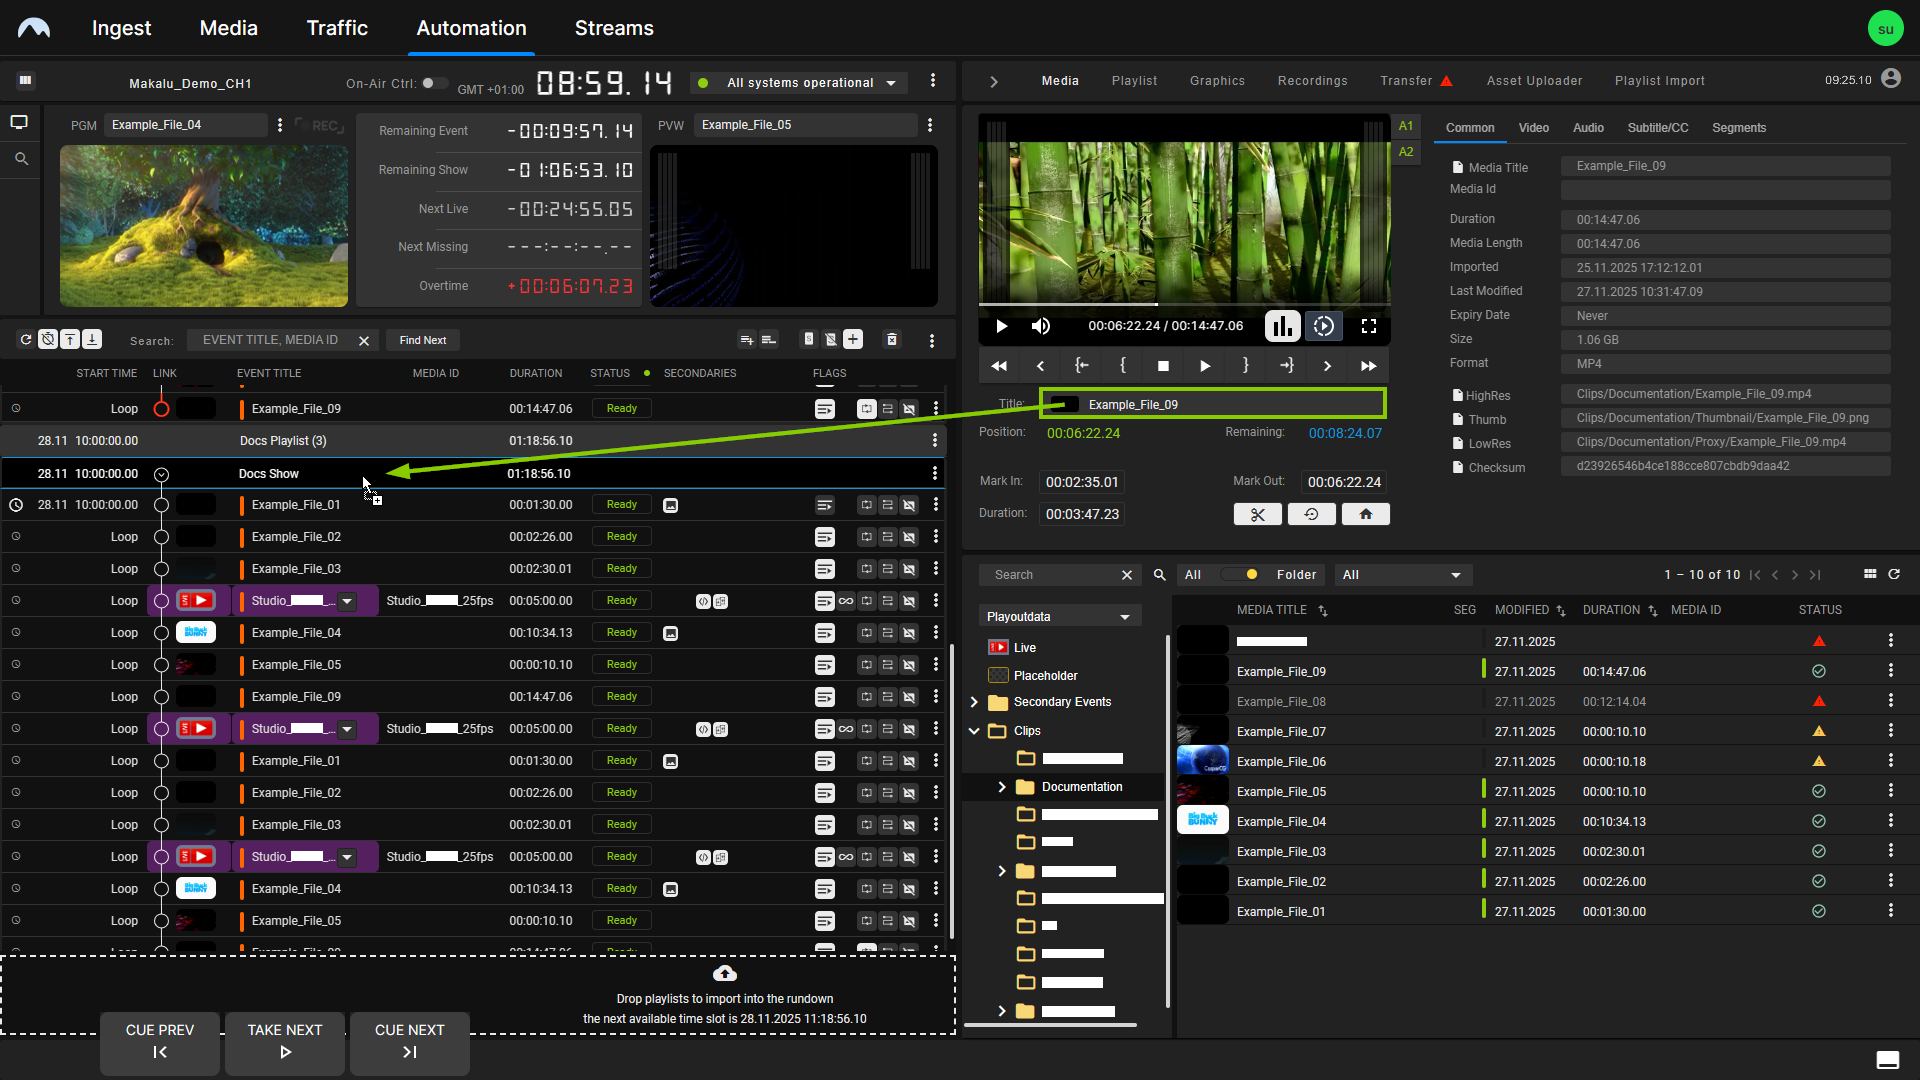
Automation - Add media segment to a show
The selected segment is added to the rundown as the last clip of the selected show.
Tip
Instead of adding a segment at the end of a show, you can also replace an individual clip in a show by dropping the draggable element directly on the clip to be replaced while holding [Ctrl]. In this case, a confirmation dialog is displayed, informing you whether the rundown duration will be shortened or extended by this replacement. For more information, see the sections Replacing a clip with another media item and Replacing a clip with another playlist item.
To add the segment before an existing clip in a show, drag and drop the draggable element on the corresponding clip (without holding [Ctrl]).
Notice
Segments in the rundown are recognizable by their color. Their scheduled duration is highlighted in yellow.
Notice
If the added file is not available on the playout nodes of the channel, file transfers and file processing are automatically initiated. Even if only a short segment was created, the full original file is copied from the ingest storage to all assigned playout nodes.
Permanent segments
To create a permanent reusable segment and add it to the rundown:
-
Select the media asset to be segmented and set the mark in and mark out as described in section Temporary segments steps 1-7.
-
Depending on how you want to add the created segment to the rundown, you have the following options:
-
If you want to create a new media asset and add it manually to the rundown, continue with step 3.
-
If you want to create a new media asset by replacing an already existing placeholder in the rundown, continue with step 4.
-
-
To create a new media asset and add it manually to the rundown:
-
Click the Trim icon
 .
.The Create segment menu opens.
-
In the Create segment menu, enter a title for the new segment and click Apply.
Automation - Create media segment This creates a new media asset in the same folder as the original asset, based on the set mark in and mark out points. It is listed in the Segments tab in the asset metadata area. The total number of segments already created for this media asset in the SEG column increases by one.
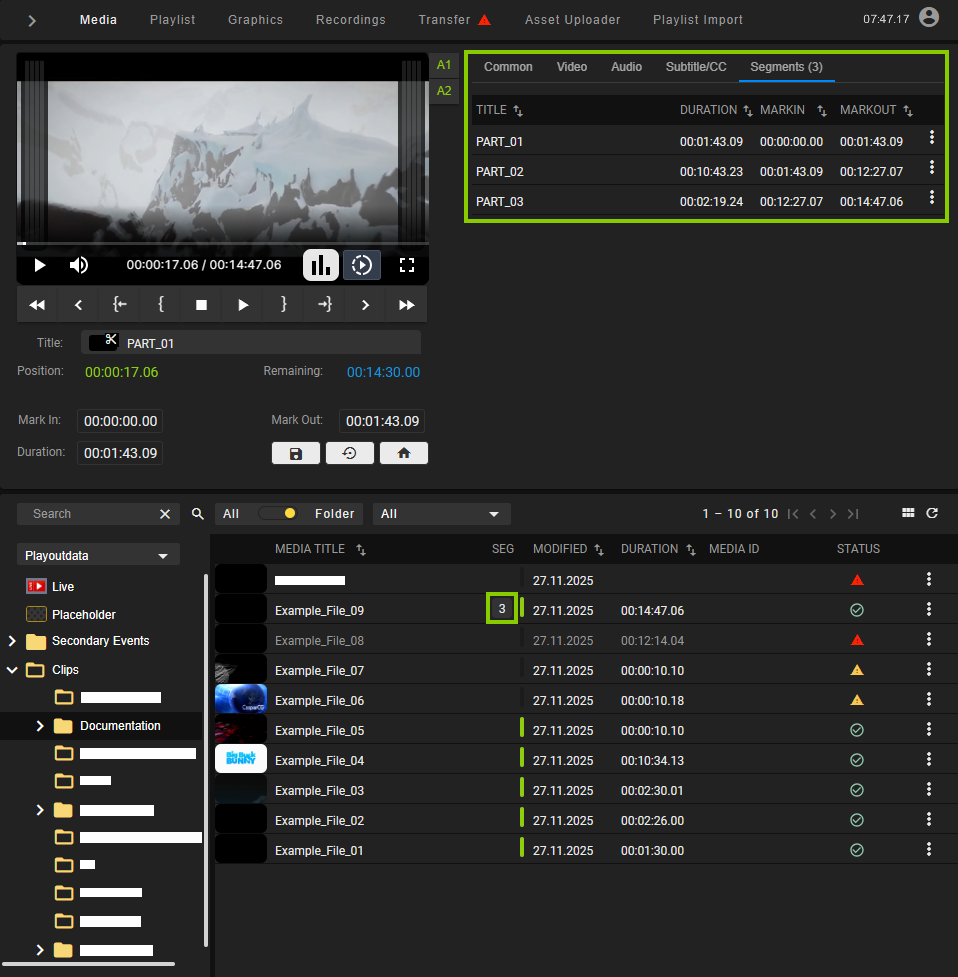
Automation - Media segment created -
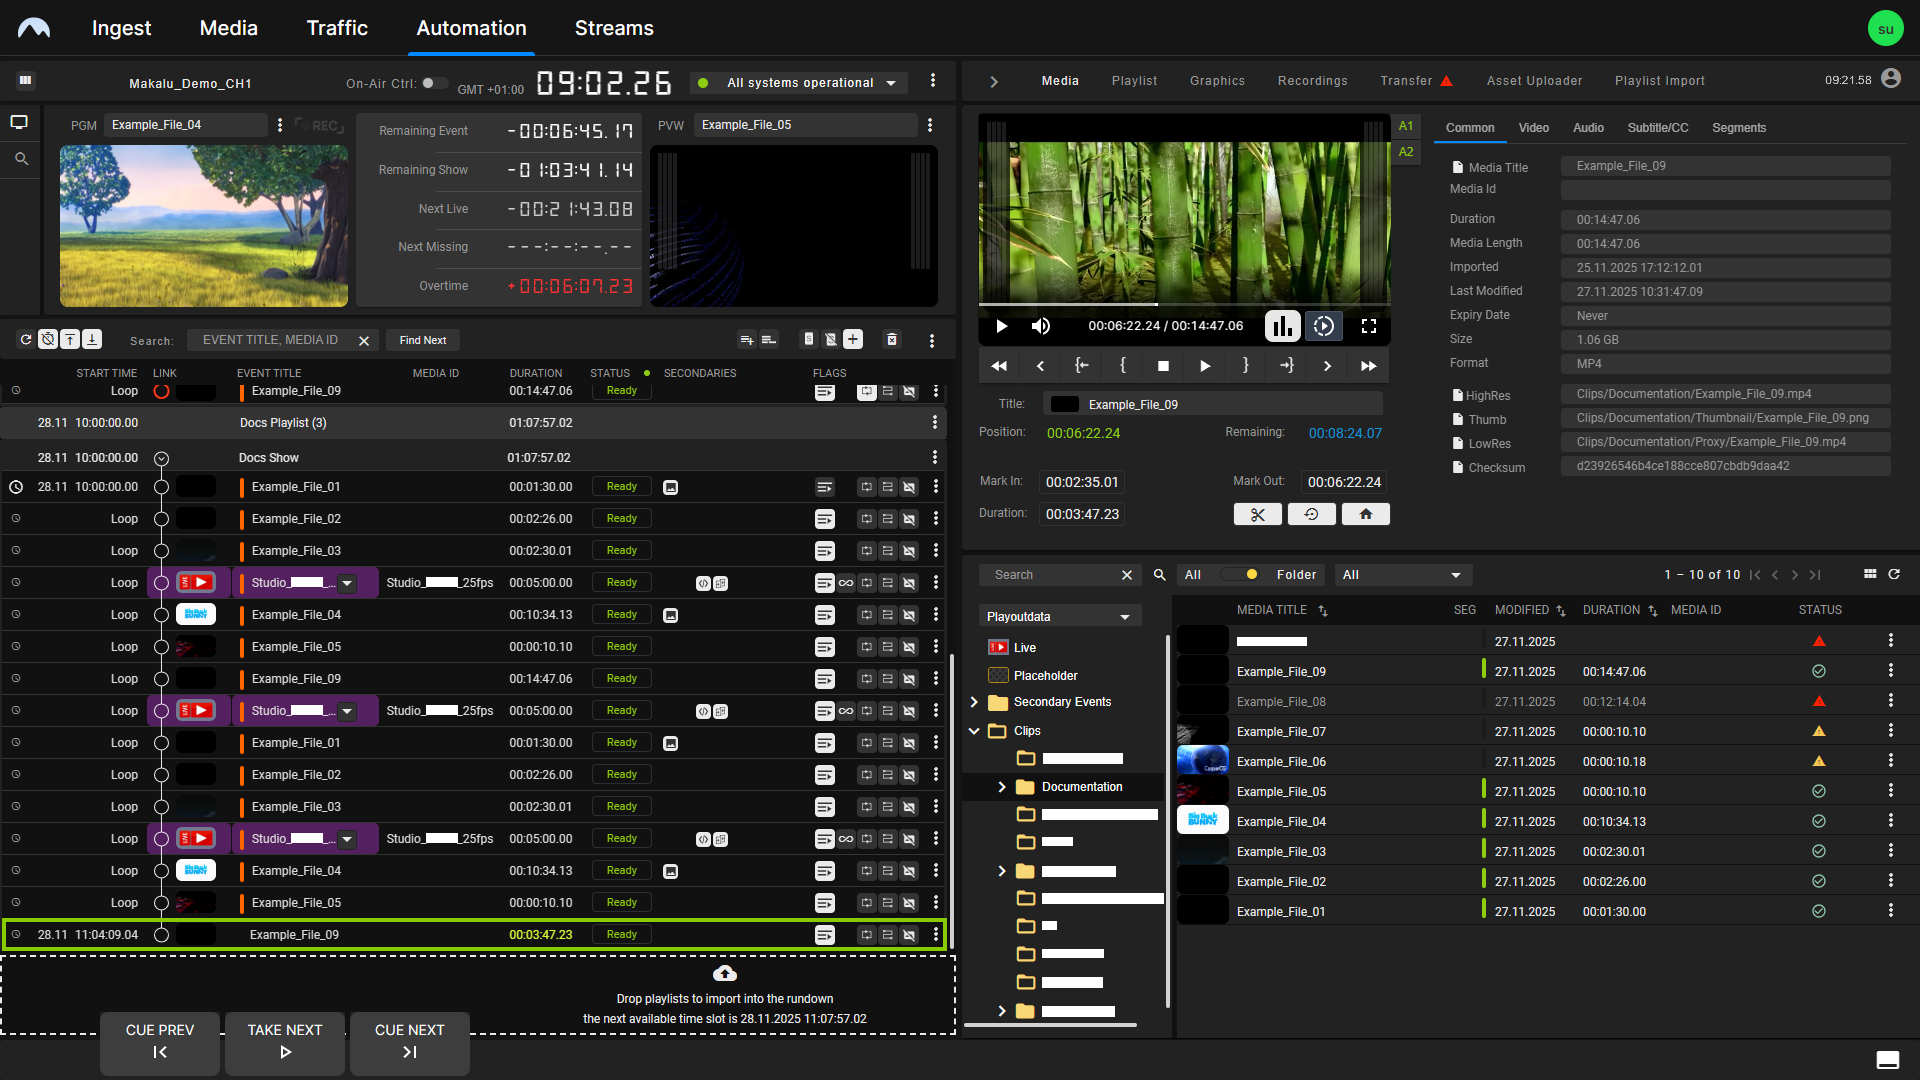
Add the created segment to a show by dragging it from the list of segments into the rundown on the corresponding show.
Automation - Add media segment to the rundown
The selected segment is added to the rundown. Its duration is highlighted in yellow as it is shorter than the duration of the original media asset.
-
-
To create a new media asset by replacing an already existing placeholder in the rundown:
-
Click the Trim icon
.The Create segment menu opens.
-
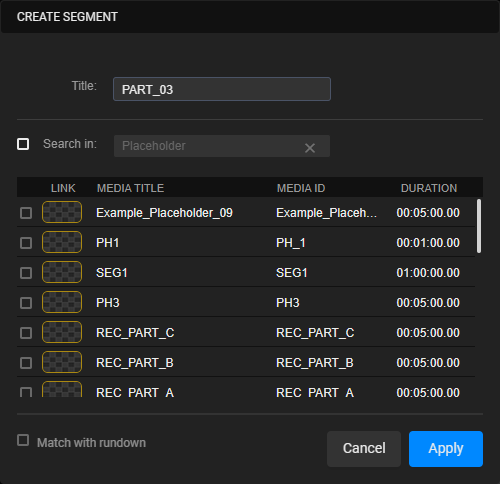
In the Create segment menu, enable the Search in checkbox above the placeholder list and select the placeholder to be replaced from the list.
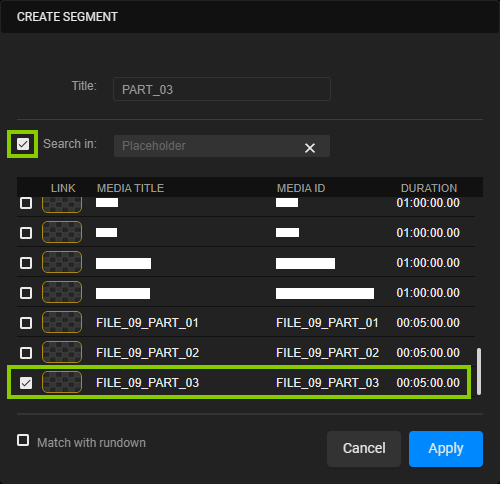
Automation - Select the placeholder to be replaced by the segment Tip
To search for a specific placeholder, enter your search term in the Search in input field. The list of available placeholders will be updated based on your input. Then, select the placeholder to be replaced.
-
(Optional) If you want to replace all occurrences of the placeholder in the rundown, enable the Match with rundown checkbox below the placeholder list.
-
Click Apply.
-
The segment is added to the rundown and replaces the selected placeholder. Its duration is highlighted in yellow, as it is shorter than the duration of the original media asset.
Notice
If the added file is not available on the playout nodes of the channel, file transfers and file processing are automatically started. Even if only a short segment was created, the full original file is copied from the ingest storage to all assigned playout nodes.
Tip - Editing a segment
You can edit a segment by selecting it in the Segments tab in the asset metadata area. Click the Options icon ![]() on the right of the corresponding segment and select Edit.
on the right of the corresponding segment and select Edit.
This loads the segment into the preview player, and you can change the mark in and mark out points as required. To confirm your changes, click the Update segment icon ![]() .
.
Tip - Duplicating a segment
You can duplicate a segment by selecting it in the Segments tab in the asset metadata area. Click the Options icon ![]() on the right of the corresponding segment and select Duplicate.
on the right of the corresponding segment and select Duplicate.
Tip - Deleting a segment
You can delete a segment by selecting it in the Segments tab in the asset metadata area. Click the Options icon ![]() on the right of the corresponding segment and select Delete. Confirm the subsequent dialog by clicking Yes.
on the right of the corresponding segment and select Delete. Confirm the subsequent dialog by clicking Yes.
Adding an existing playlist to the rundown
To add an existing playlist to the rundown:
-
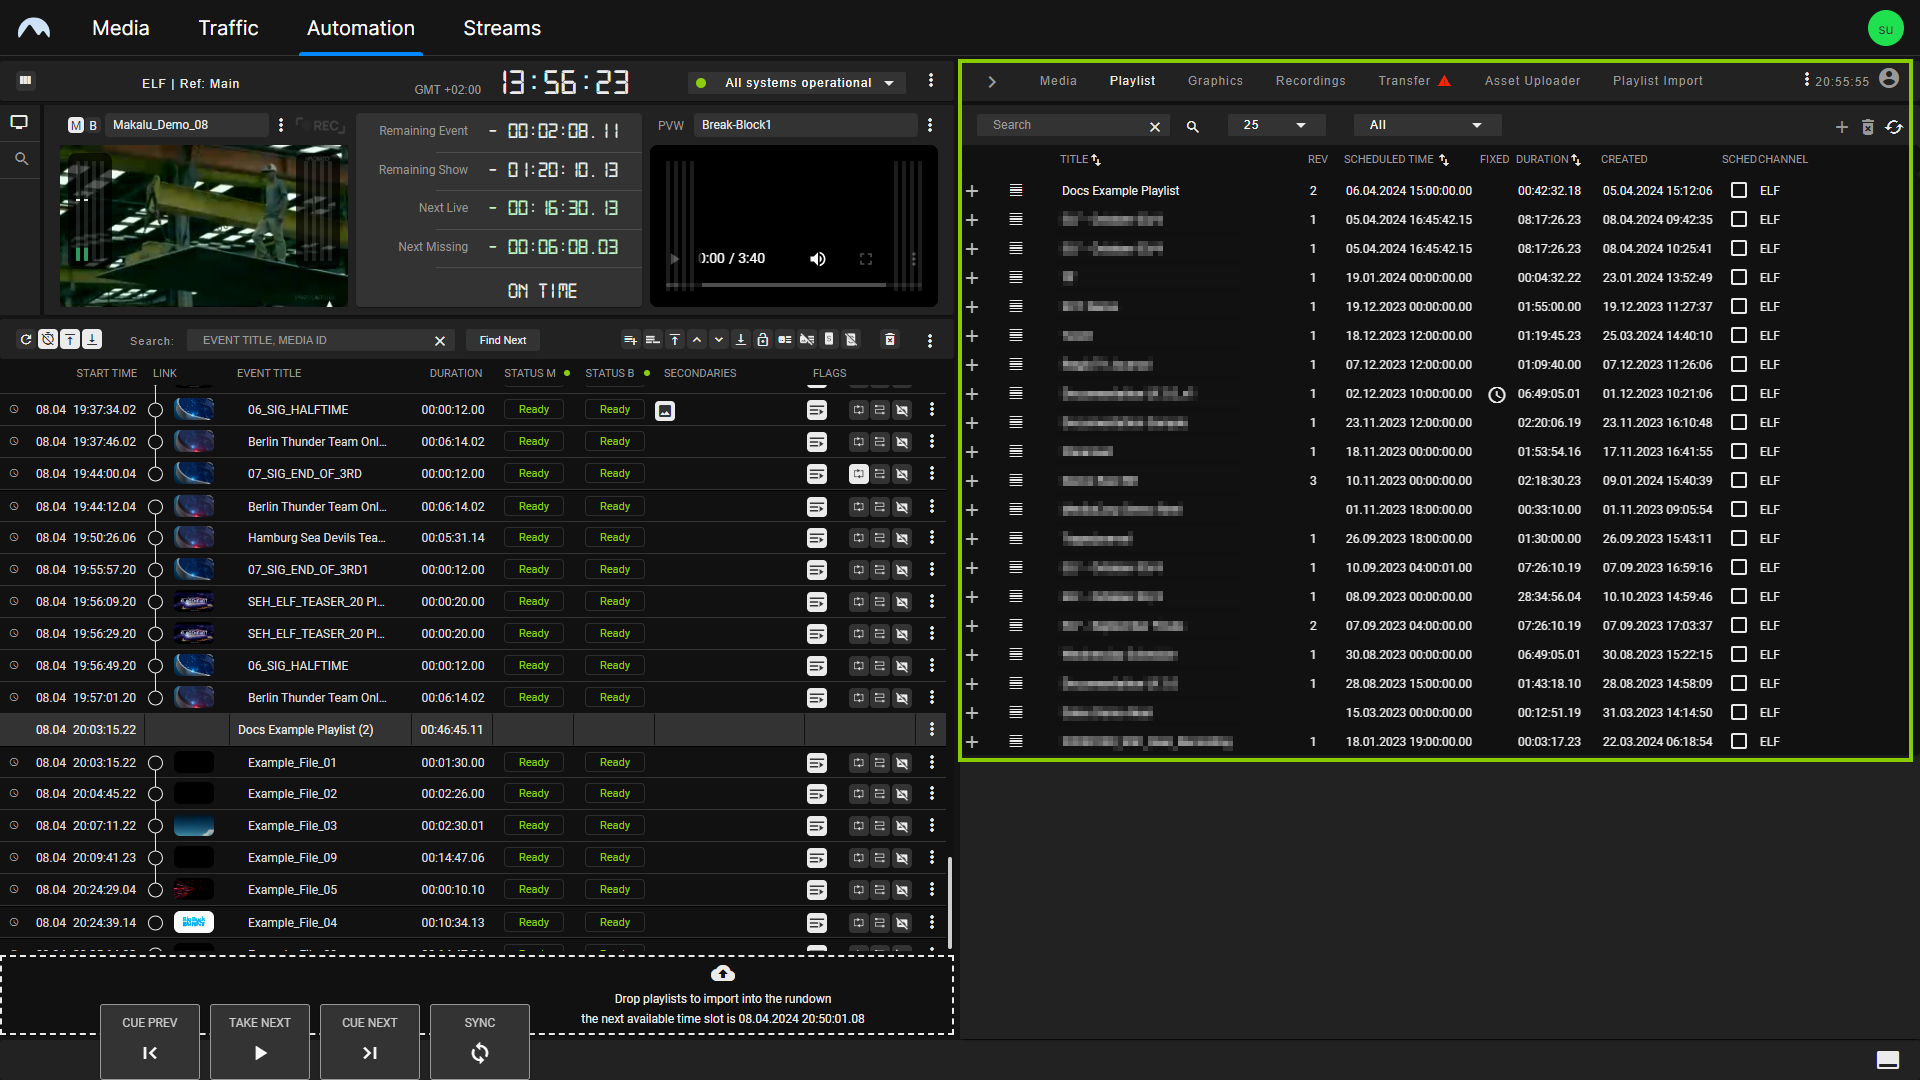
On the right, select the Playlist tab.
All available playlists for the current channel are listed.
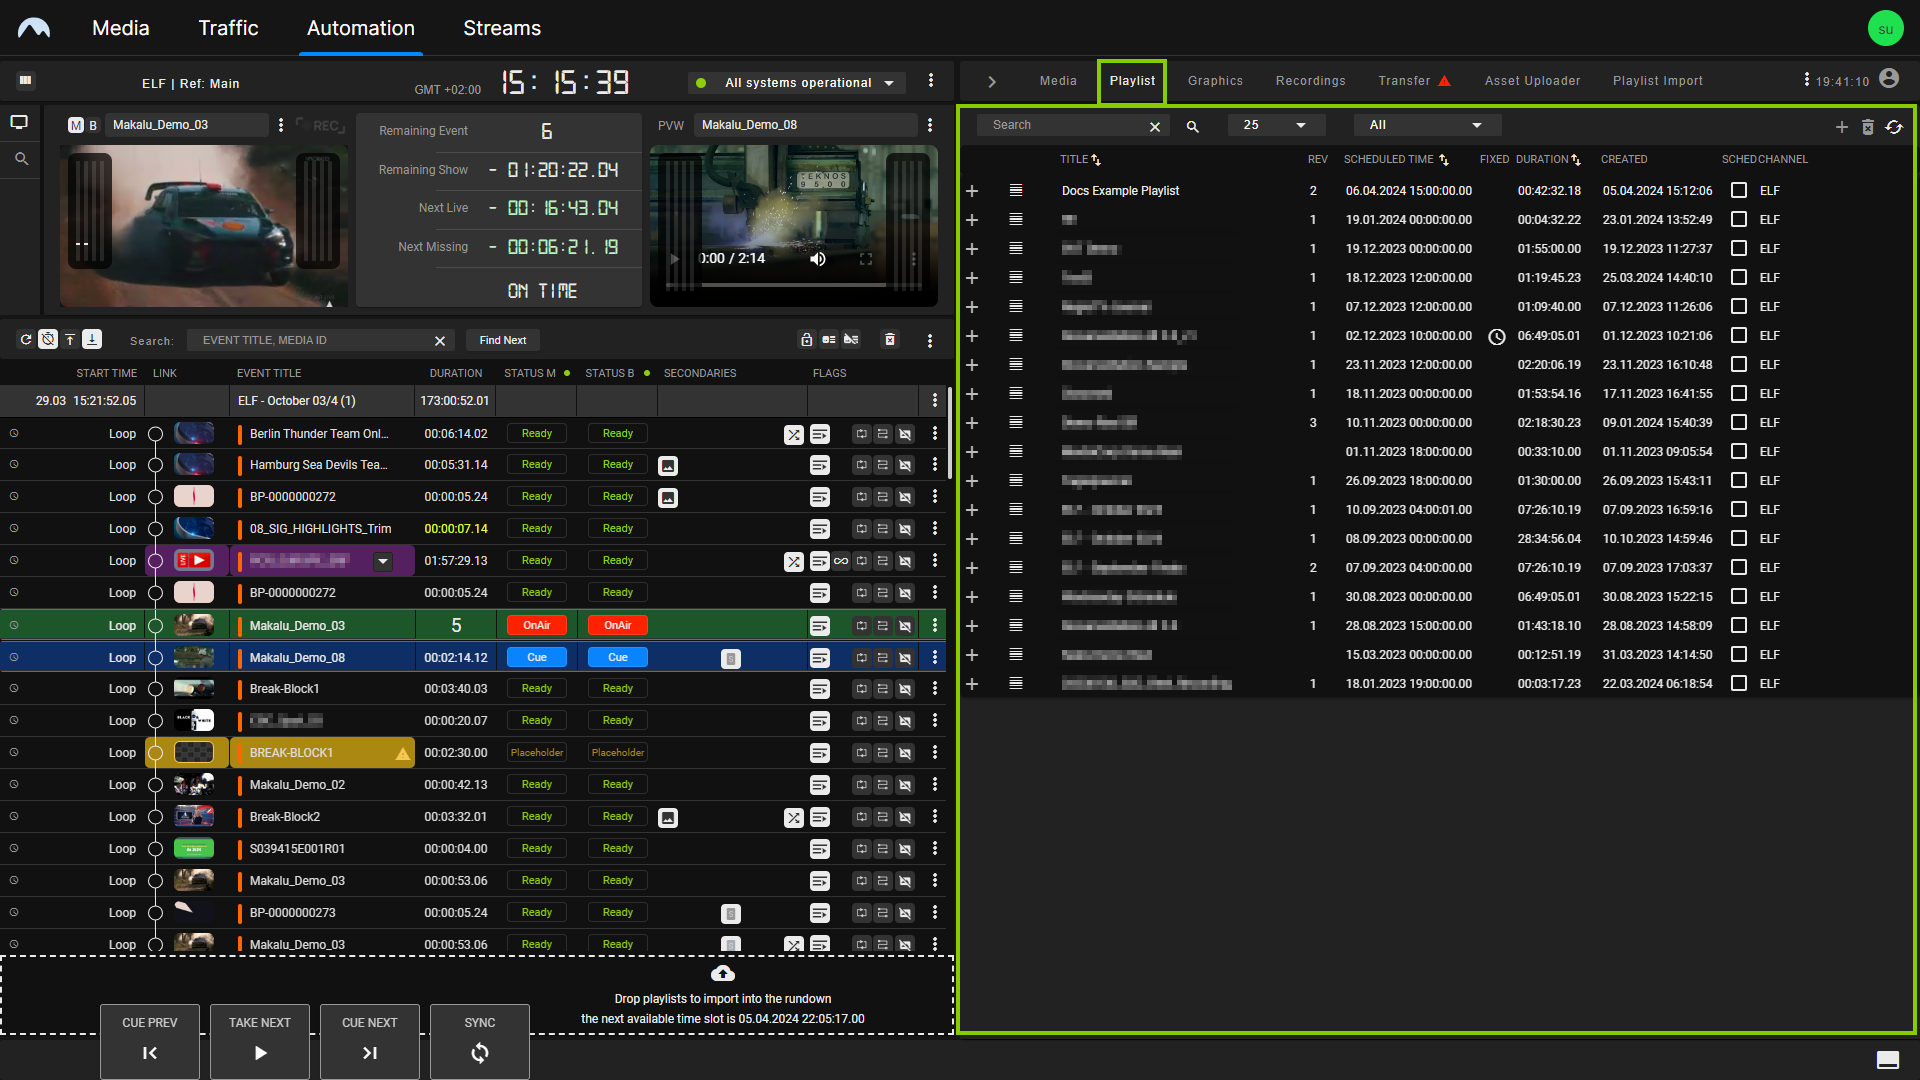
Automation - Available playlists -
To add a playlist to the rundown, you can either:
-
Select a playlist by clicking the corresponding row in the Playlist tab (the row will be highlighted in blue) and click the Plus icon (Add playlist to rundown) at the top right, or
-
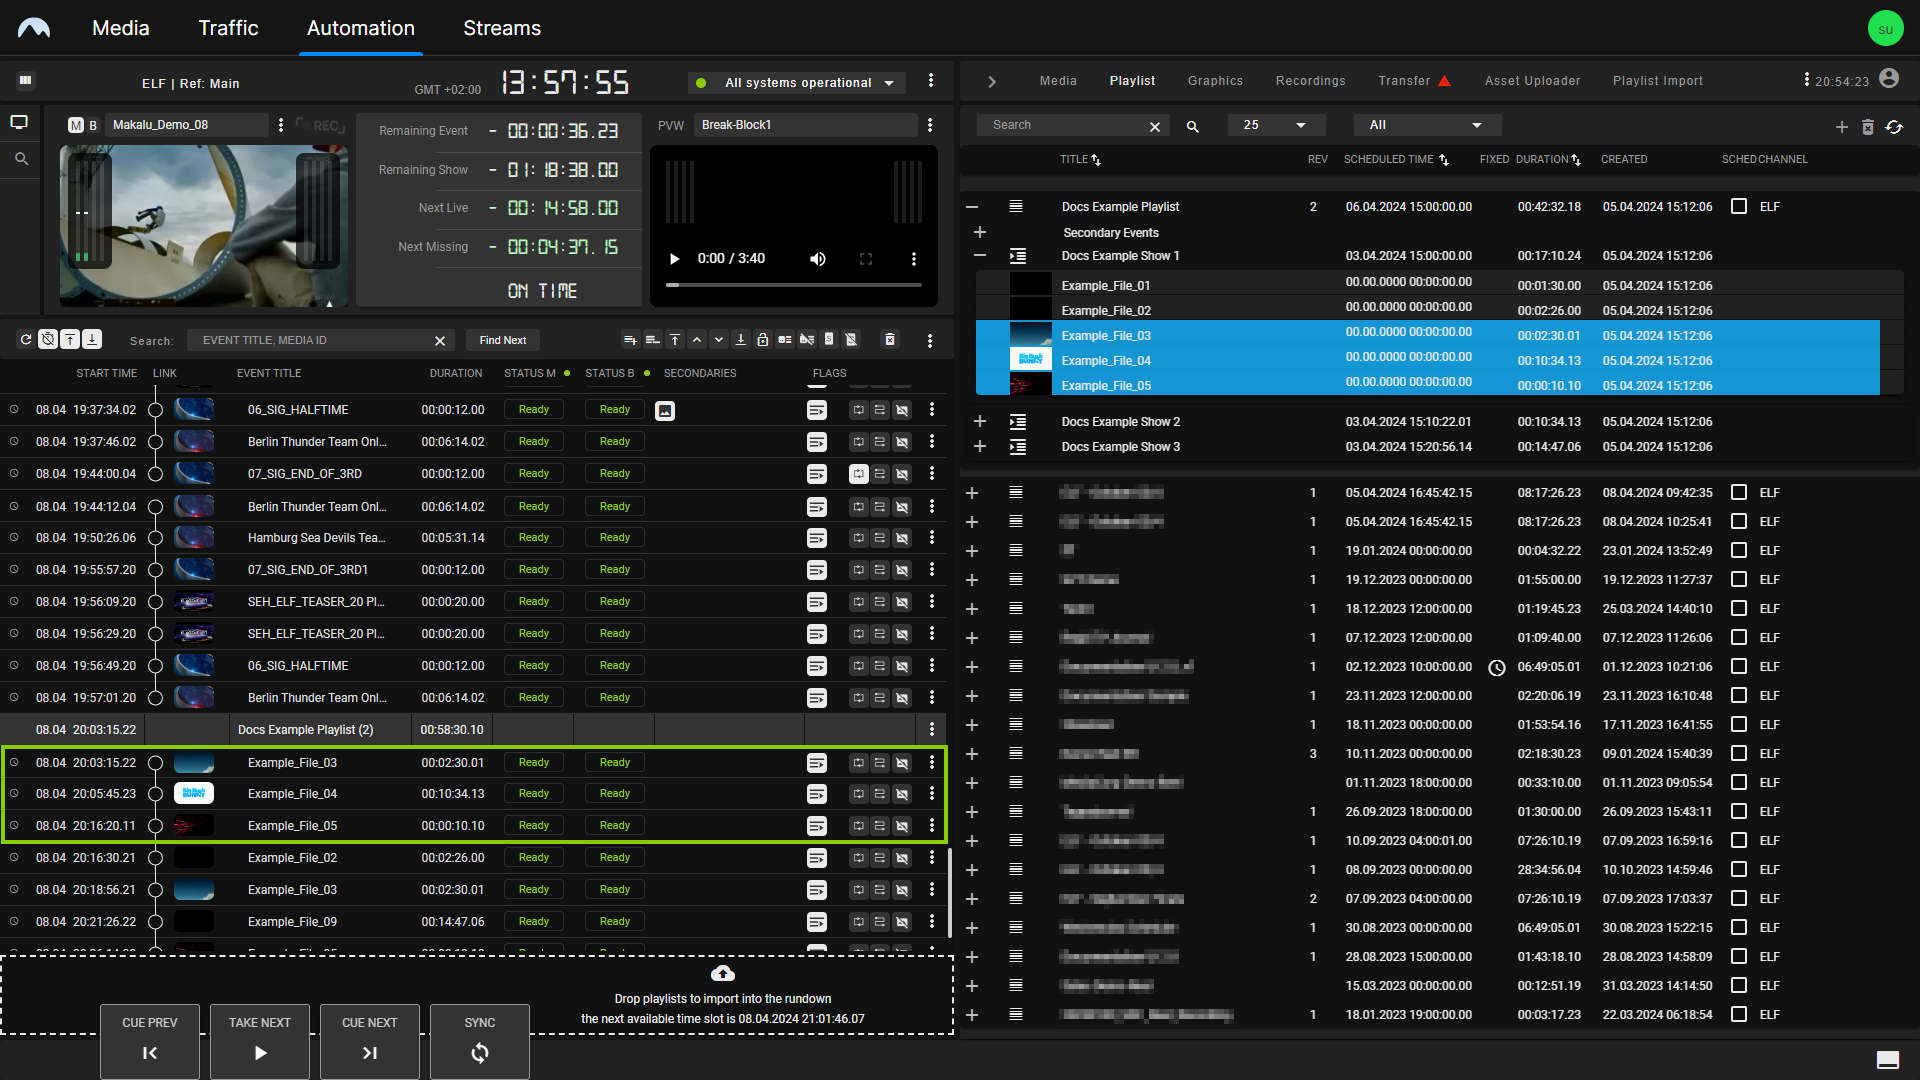
drag a playlist and drop it on the dashed area at the bottom of the rundown.
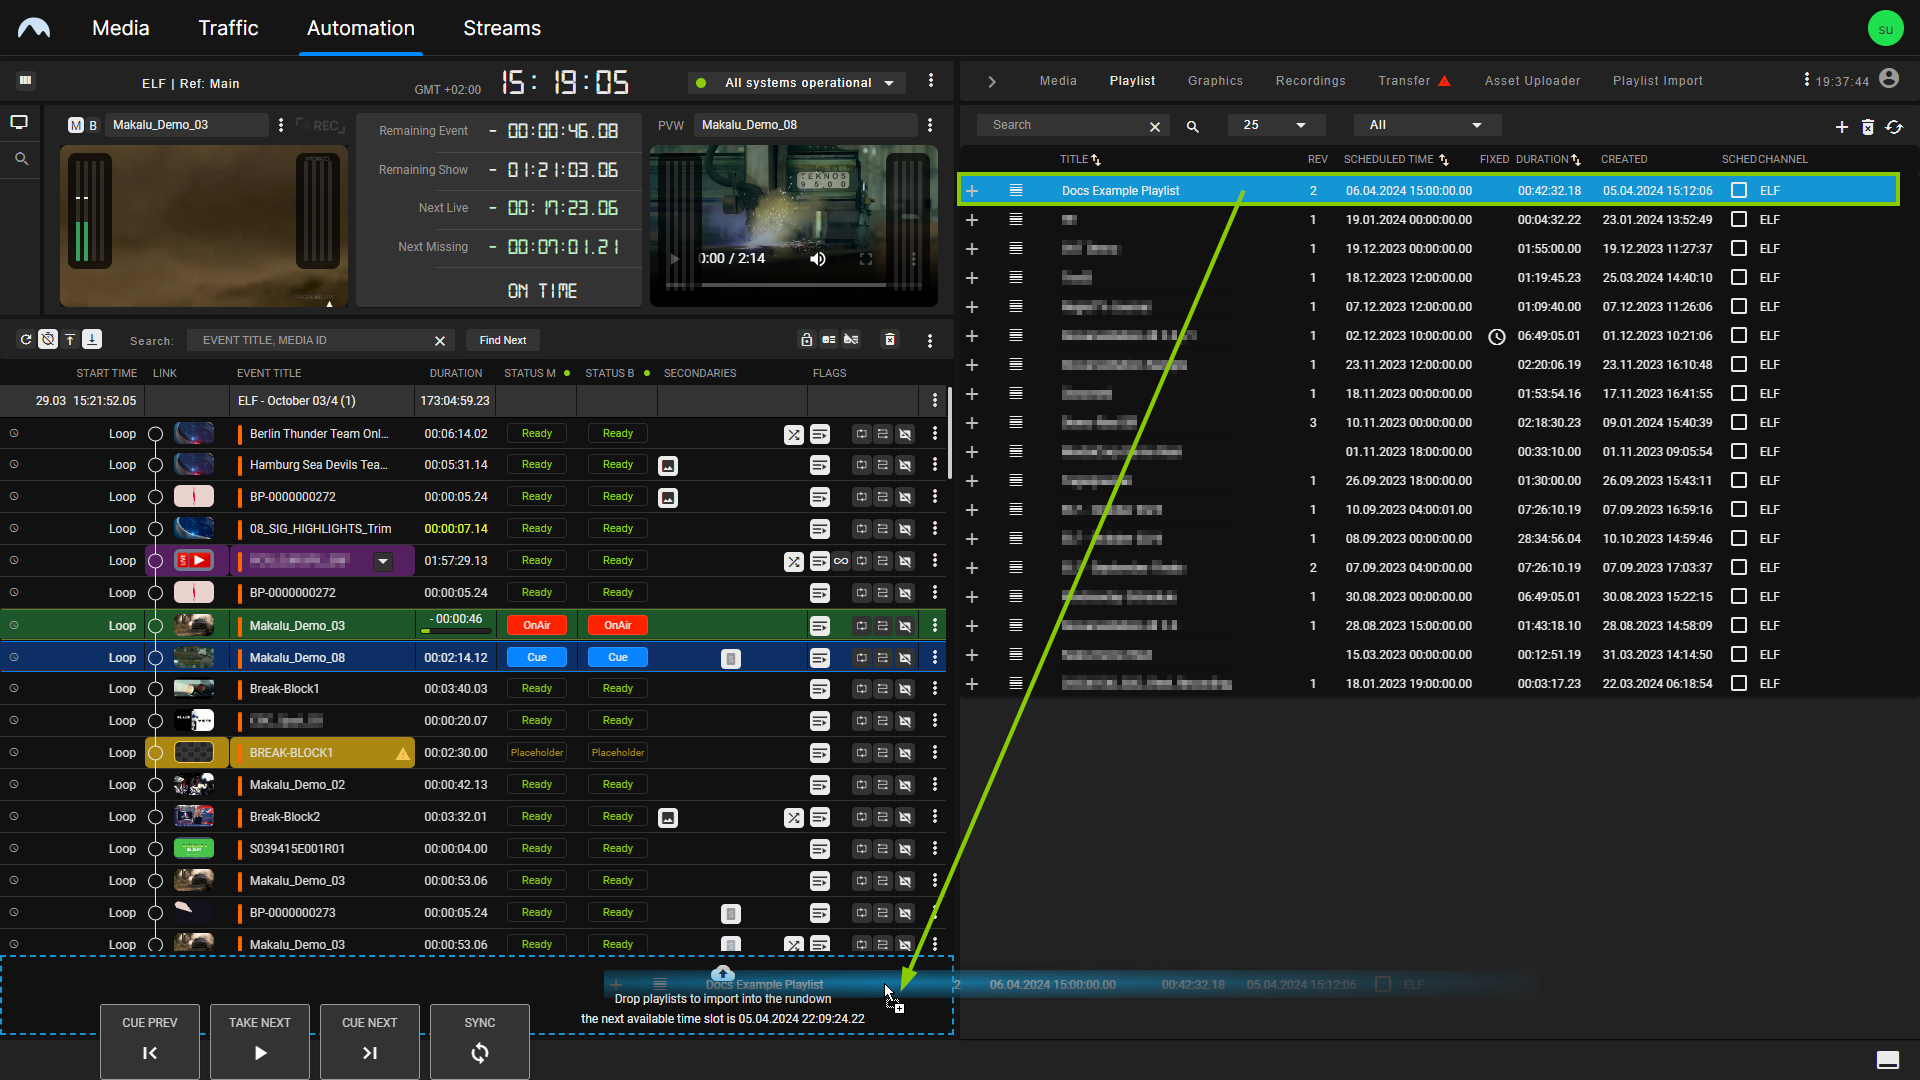
Automation - Add a playlist to the rundown Notice
If the rundown is currently empty, a dialog is displayed that asks you to select a start time for the playlist. Select the start time and click Apply to confirm.
The playlist is added to the rundown.
Notice
If you selected a start time, the playlist is added based on your selected start time. Otherwise, if the rundown previously already included playlists and you did not select a specific start time, the new playlist is added as the last element, and the start time is dynamically calculated without creating gaps.
Notice
Depending on the playlist size, adding a large playlist to the rundown can take a few seconds. While a playlist is being added to the rundown, the add function is locked. Another playlist can only be added once the current adding process has been completed.
-
-
(Optional) To display shows in the rundown, click the Options icon
in the toolbar above the rundown and select Display shows. To expand a show included in the added playlist, click the corresponding Expand icon in the link column.
The show is expanded, and all included clips are listed.
Tip
To add a playlist to the rundown at a specified start date/time, activate the checkbox in the Sched column (short for "scheduled") before you drag the playlist onto the Dropzone area or click the Add playlist to rundown button.
If the playlist already has a specified start time, this will be applied. If the playlist has no specified start date/time, a dialog is displayed that asks you to select the start time.
Notice
You cannot add a playlist with a specific scheduled start date/time to the rundown if there is already a playlist in the rundown scheduled for the same date/time.
Notice
Playlists with a fixed start date/time can only be added to the rundown if the start date/time is in the future.
Notice
If the added playlist includes files that are not available on the playout nodes of the channel, file transfers are automatically started. As a result, all corresponding files are copied from the ingest storage to all playout nodes that are assigned to the channel. See the section File transfer for more information.
Adding a playlist item to the rundown
In addition to adding an entire playlist to the rundown, you can also add one or more individual playlist items from another playlist to the rundown using the Playlist tab.
To add one or more items from another playlist to the rundown:
-
On the right, select the Playlist tab.
All available playlists are listed.
Automation - Playlist tab -
Expand a playlist by clicking the corresponding Plus icon.
All shows included in the playlist are listed.
-
Expand a show by clicking the corresponding Plus icon.
All clips included in the show are listed.
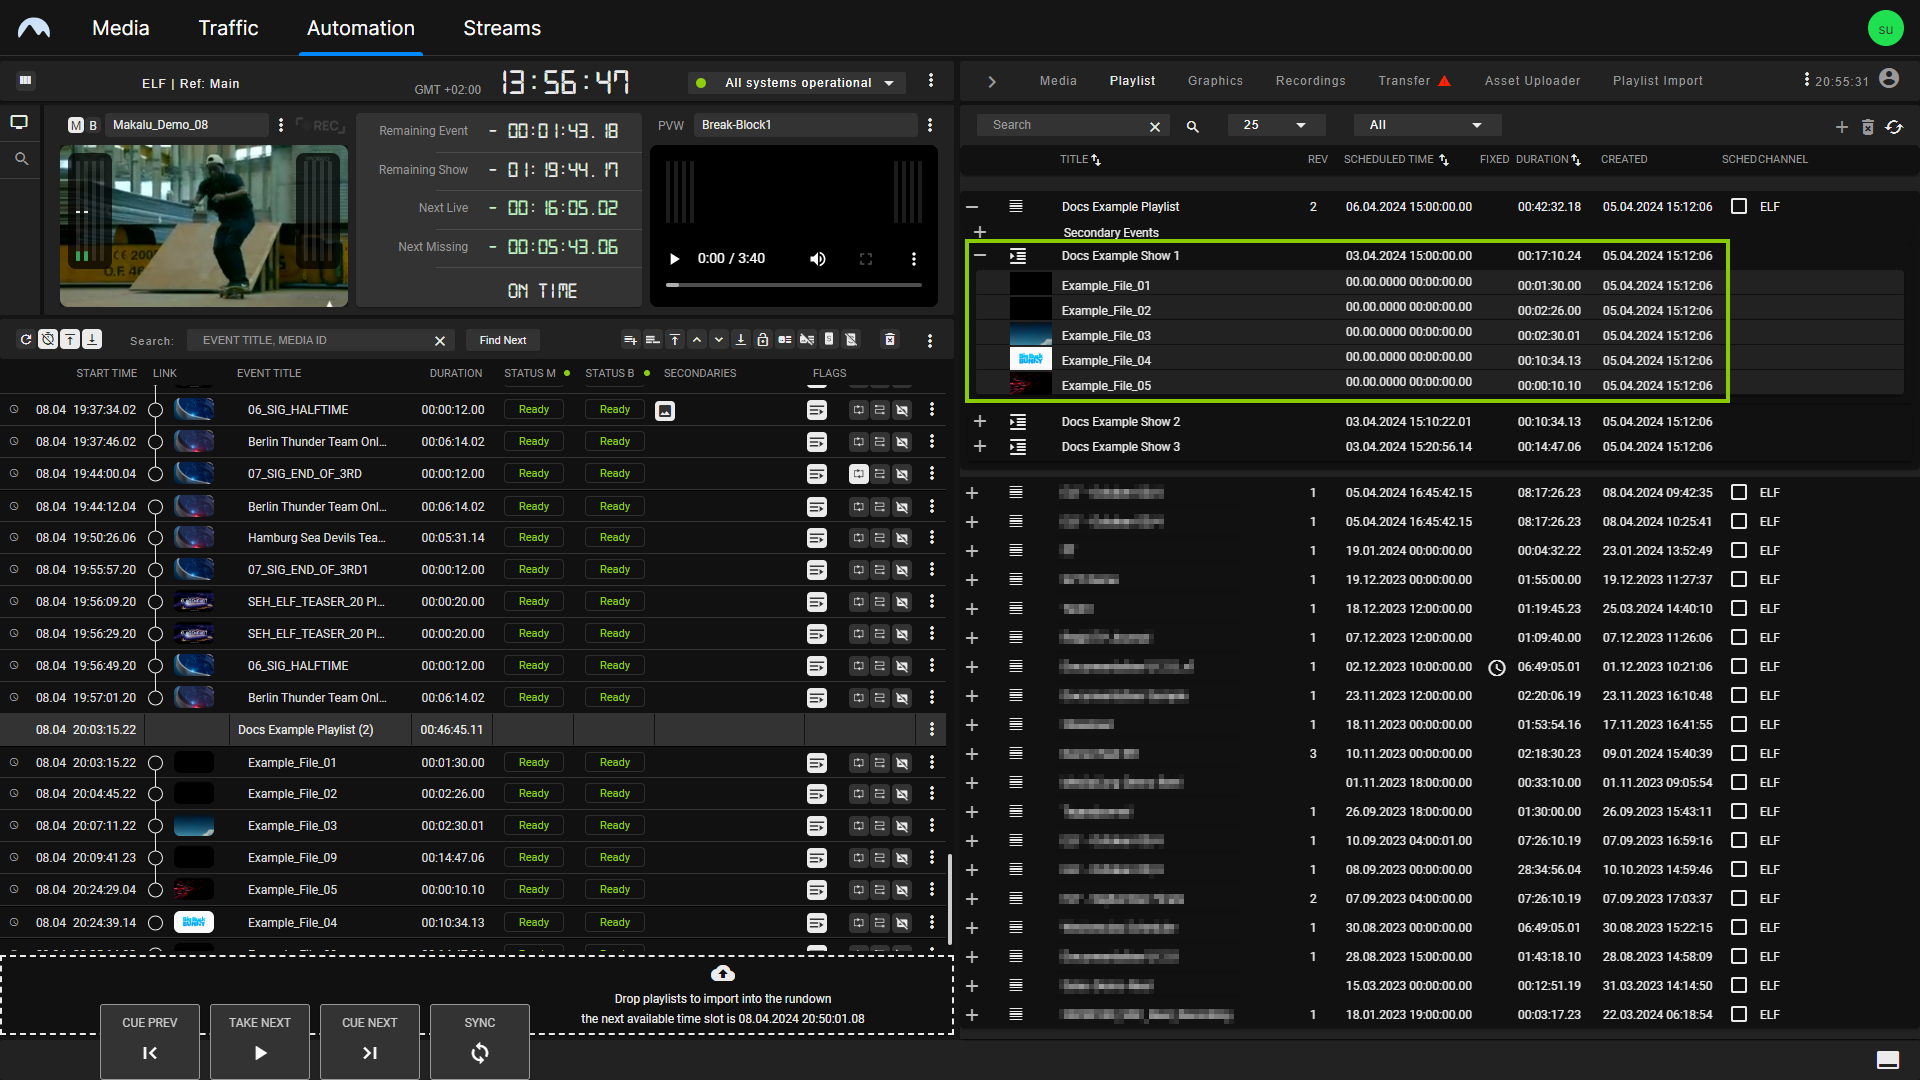
Automation - List of clips -
Select one or more clips to be added to the rundown.
Tip
You can select multiple individual clips from one or more playlists by holding [Ctrl]. To select multiple consecutive clips from a playlist, hold [Shift].
-
Drag the selected clip(s) to the desired position in the rundown.
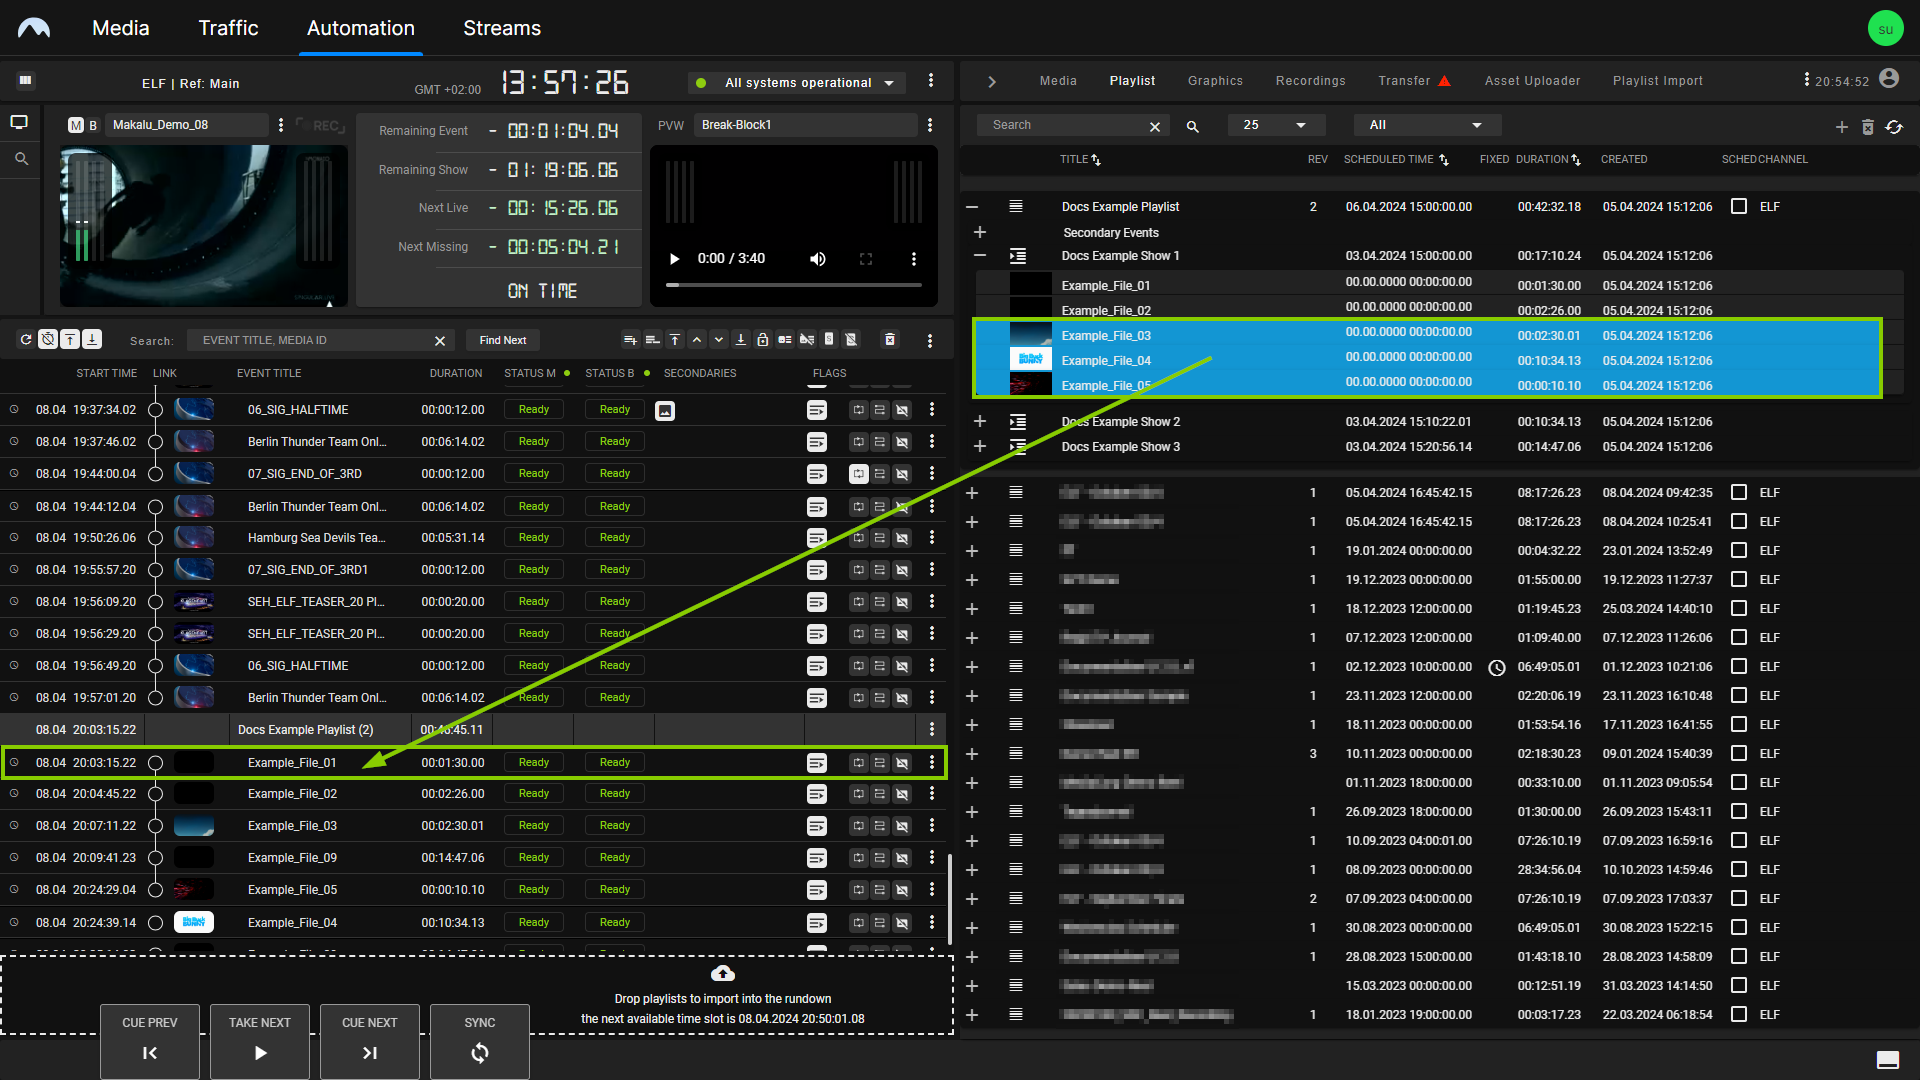
Add playlist items to the rundown via drag and drop Tip
To find and select a specific playlist as a target for adding the new playlist items, you can jump between the playlists in the rundown by using the Next playlist icon
 and Previous playlist icon
  on the left above the rundown.
Tip
To add the new items at the end of a show or playlist, drag them onto the corresponding show or playlist in the rundown. To insert the new items at a specific position in the rundown (before a specific clip within the clip order), drag them onto the corresponding clip.
Notice
If secondary events are assigned to the selected playlist items, they are retained when the playlist items are added to the rundown. If default secondary events are configured for the corresponding Makalu channel, they are also added automatically when the playlist items are added to the rundown.
The selected playlist items are added to the rundown.